

My Sister-in-Law sent a request for a craft. Be still my heart. Is there anything better than a commission gift? That is the best kind of crafting! (You know the craft will be appreciated, and not just “tolerated”. )
She asked for an over the door display for Christmas cards. The one she sent me as an example was from Country Living

They live in a ranch house in San Jose, so I edited the design a bit.
Ribbon Christmas Card Display
Supplies:
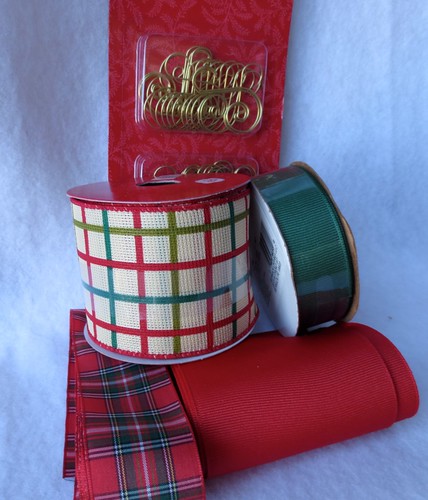
(I made 3 strips. Each is made from two ribbons, each section of ribbon starts out 6 feet long. For my card holders, I combined ribbons sold by the yard, with ribbons sold by the roll.)
- 2 rolls of ribbon (this made 2 strips)
- 2 six foot lengths of ribbon (this made 1 strip)
- Extra ribbon to trim the top and bottom (Optional)
- 1 package of ornate clips (these are ornament hooks, but these paper clips would work too)
- Thread to match
Supply note: This whole project rests on the ribbons. One needs to be wider and one needs to be narrower so it can layer over the other. This could be a dollar store craft or this could be an over-the-top vintage ribbon extravaganza.
Take the two ribbons and fold them over at the top to create a nice hem.
At the bottom, take the accent ribbon and give it a nice cut finish. Then hem the bottom of the main ribbon.
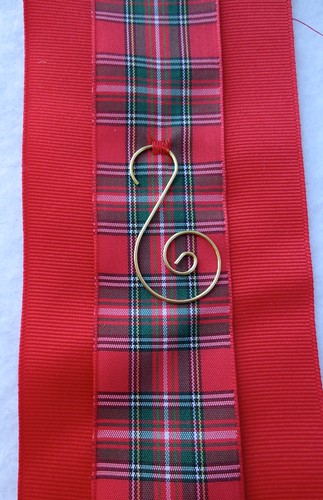
To attach the clips, you will make a little loop. You could do this with thread by hand or with a sewing machine.
Set your machine to zig zag stitch. And make the stitch length VERY long. Mark the center of the ribbon. And make a 1/4 inch stitch, then stop. Make sure both ribbons are flat, and lined up, so that they are even and not buckling.
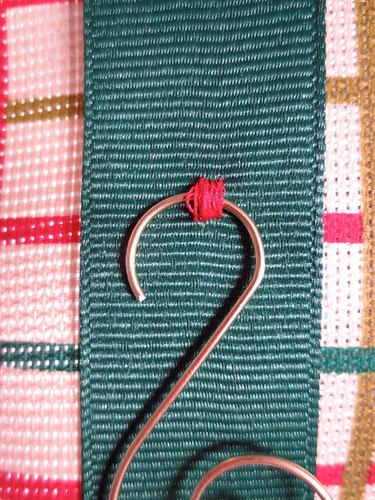
Trim the threads close.
I used a ruler, and marked 5 inches down and made the next zig-zag loop.
When I was done, I pushed all the curly clips through.
One of the main design features of the inspiration ribbons was a button between each card. But that feature limits the number of cards that can be displayed. Five inches will represent the smallest card. The picture cards are sometimes 8 inches long. That would ride right over one clip and you would just use the next one.
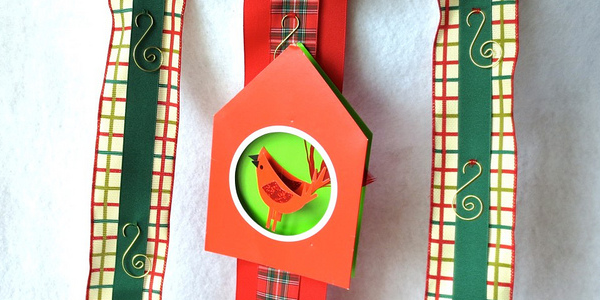
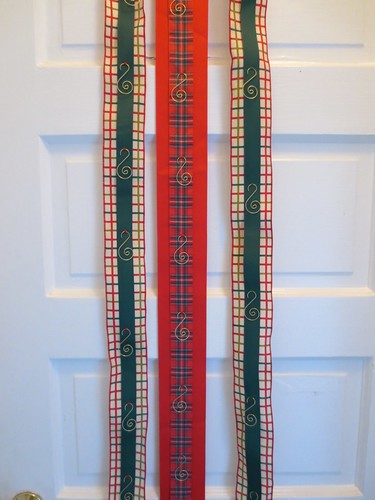
Here is how the red ribbon looks
On the top, I sewed some loopy bows (by hand) and then tacked those on.

The last step is to figure out where these are going to live and make a mechanism to attach them.
My sister in law was going to hang them on some “shutter” style doors between her kitchen and family room. I made thread loops on the back, and gave her the strong “removable” hooks. Over the door hangers would work well also. (shown below on the back of a door.)
And, just in time for the flood of cards that is coming. We get our first card on Thanksgiving weekend. So here they come.
© 2005 – 2012 Kathy Lewinski & Susan Cornish


5 Comments to Christmas Card Display