

Every good crafter knows it’s never too early to start working on things for the holidays. To that end, we are going to launch The Advent Calendar Project. It starts today, and runs through the twenty-five weeks until December. First we’ll show you how to make this pocket advent calendar. Then each of the next twenty-four Fridays we’ll make a Christmas ornament to go in one of the pockets. By December 1st we’ll have an Advent Calendar filled and ready to go.
We don’t expect anyone to get the actual calendar part of this project done in one week. It is something you can work on throughout the months leading up to December. The ornaments will be smaller in scale, and can definitely be done in one week.
I know advent calendars are usually filled with little toys or candy, but I thought it would be fun to fill one with little Christmas ornaments to go on the tree every day. (Actually, my husband Matt thought of the idea, but I’m the one bringing the idea to life!) The ornaments will run the gamut of crafting genres so hopefully there will be something for everyone. Join us in this project anyway you want; make the calendar and all the ornaments, make the calendar and fill with other things or just make the ornaments you like for the tree or to decorate presents.
Advent Calendar
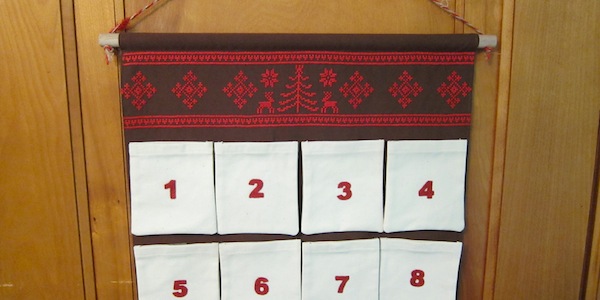
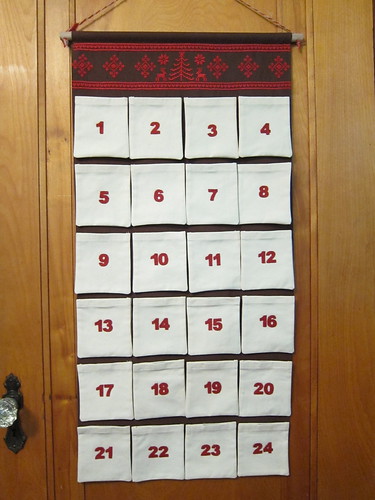
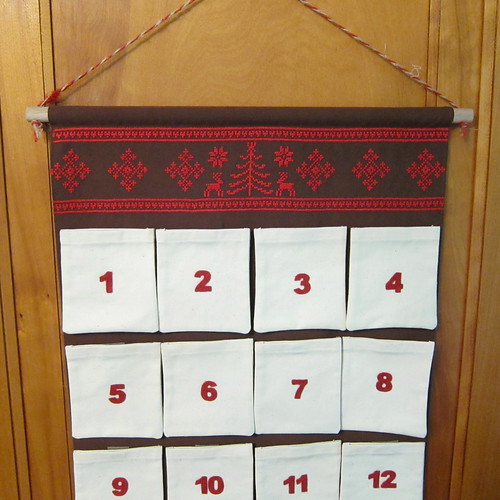
Let’s make the calendar. This calendar is 16″ wide and 34″ long. It’s perfect to hang on a door like in my photos. The pockets are approximately 4″ x 4 1/2″ which means they are big enough to hold things like a LEGO mini-figures or a small box of crayons.
Below I’ll explain how I made my calendar, and at the end of some of the steps I’ll give options for you could personalize your calendar. Click on any picture in the tutorial to see it bigger.
Supplies:
- 37″ x 17″ piece of heavy dark brown canvas
- Enough ecru or natural fabric to cut 48 squares 5.75″ x 5″ (I found muslin to be too see through so ended up using drapery liner for my bags.)
- Matching thread for both fabrics
- Waste canvas, 14 count (Waste Canvas
is used as a guide for cross stitch. Its threads are held together with a water soluble glue so it can be removed when you are finished stitching.)
- 3 skeins red embroidery floss
- Embroidery needle
- Red wool felt
- Fabric glue
- 24″ iron-on velcro
- 5/8″ dowel cut to a 18″ length
- Twine to hang calendar
- Iron
- Sewing Machine
- Scissors
Make the base of the calendar:
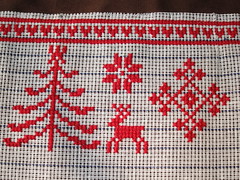
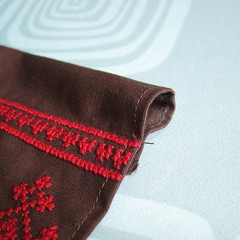
1. The base of your calendar is the 37″ x 17″ piece of brown canvas. Start by adding a decoration to the top of it. I did a cross stitch pattern that I designed. (You can download advent calendar chart here) The pattern needs to be 2 1/2 inches from the top of the fabric, to leave room to turn it down and make a casing for the dowel. The pattern works easily using waste canvas. The canvas is basted into place and then you cross stitch normally. Be careful not to stitch through the canvas strings or they won’t pull out when you are done.

It can be a little tricky to keep the waste canvas straight on this long stretch, even though it’s basted on. Just work carefully and try not to pull the canvas as you are holding it. When it is completely stitched, wet the canvas down and carefully pull out the strings. I found a pair of pliers made this easier. Option: Don’t want to cross stitch? There are lots of ways you could decorate your calendar. You could applique felt shapes, embroider something, use stencils and fabric paint or just sew on a pretty ribbon.
2. Hem the long sides and the bottom of the calendar 1/2-inch. You can just turn them towards the back and sew them down. If you want a more finished look turn them 1/4-inch and then 1/4-inch again before sewing down.
3. Create the sleeve for the dowel at the top. Fold the top of the calendar over 1/4″ then fold again so there is 1 inch of fabric above your decoration. Sew down right at the top of the decoration.
Make the calendar pockets:
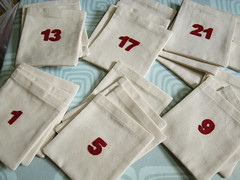
1. Cut your ecru fabric into 48 rectangles measuring 5.75″ x 5″. Option: You could also cut 24 rectangles that measure 10.75″ x 5″ Then when it comes time to sew you just fold them in half an sew up the sides. My only thought is this way the bottom of the pocket may sag a little if something heavy is in it.
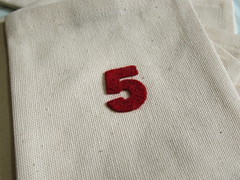
2. Cut the numbers 1 – 24 out of red felt. My numbers are about 1″ tall. I printed the numbers out on a piece of paper, cut them out and used a glue stick to attach them to the felt. Then I just cut around the paper template giving me the felt numbers. The paper peels right off the felt.
3. Using fabric glue, glue the numbers to 24 of the fabric rectangles. A small paint brush helps spread the glue on. Options: You can number the pockets in lots of different ways, iron-on numbers, stamps, stencils or even free-hand. If you are worried about the numbers not being straight after you sew the bags together then do this step after step 4, I was just worried about the glue sticking the pocket shut.
4. Sew the pockets together. I found it best to sew the top hems first. Hem the top of each of the 48 rectangles by folding the fabric over 1/4-inch and then 1/2-inch, and sew in place. Place two of the fabric rectangles together with the right sides facing each other. Sew the sides and bottom together with a 1/2-inch seam allowance. Trim the seam allowances and clip the corners. Turn right side out and press.
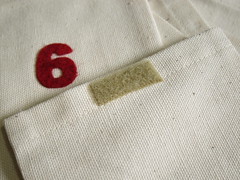
5. Cut the velcro in half length-wise so you have two 24″ strips. Now cut each strip into 24 1-inch piece. Iron the velcro on to the inside of the bag.

Option: You also could make the bags close in other ways; snaps, buttons or drawstrings could be cute.
6. Iron another piece of velcro on to the back of the bag (this will attach it to the calendar). I found that the glue on the velcro will adhere through all the layers to make that back piece stick. Never iron on the velcro directly – it will melt.
Options: If you don’t care about being able to remove the pockets from the calendar you could skip this step and the first one in the next section, and just sew the pockets on.
Finish the calendar:
1. Iron the velcro on to the calendar to hang the pockets.
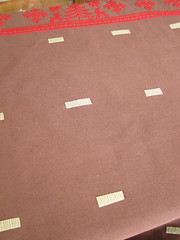
I placed the velcro at 2″, 6″, 10″ and 14″ across the width of the fabric. The rows are spaced out 4 1/2″ between the bottom of one piece of velcro and the top of the next. Attach the pockets to the velcro.
2. Put the dowel through the sleeve for it at the top of the calendar. Attach the twine. I had my husband drill a hole in the dowel and put the twine through it, a 5/32 drill bit made the perfect size hole.

Option: You can also just glue or tie the twine around the dowel.
Now you calendar is ready to hang and fill!
Next Friday we’ll be back the the first ornament.
© 2005 – 2012 Kathy Lewinski & Susan Cornish


Pingback: Free Knitting Patterns: Ornaments for an Advent Calendar – Knitting