


This is a follow-up to the post a did a couple weeks ago on how to make antiqued silver eggs using tin foil and black paint. A lot of people were very excited with the technique and talked about using it to antique other things like Christmas ornaments and frames. I had also planned on using the technique on something bigger than an egg, so I thought I share the results and some tips with all of you. (I am not going to go step by step through the process to do the tin foil antiquing in this post as it is the same as in the egg post.)
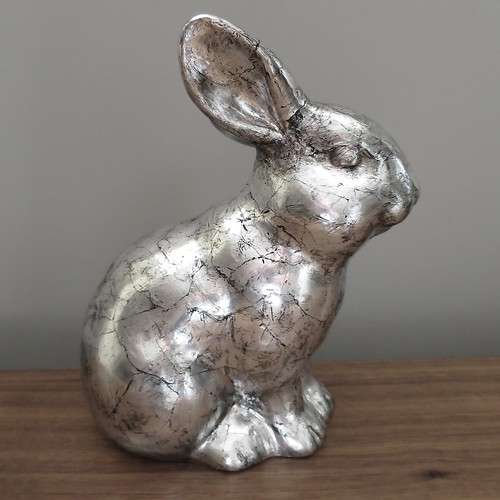
The item I picked up to antique was a bunny statue. It was about seven inches tall and shiny, white ceramic. It was really cheap at Target and had a few flaws in the finish which made it a good candidate for refinishing.

The first thing I was concerned about was whether or not the tin foil would stick to the shiny ceramic. I tried sanding the finish down, but couldn’t get any of the shine off, so I just went ahead with gluing the tin foil pieces on.
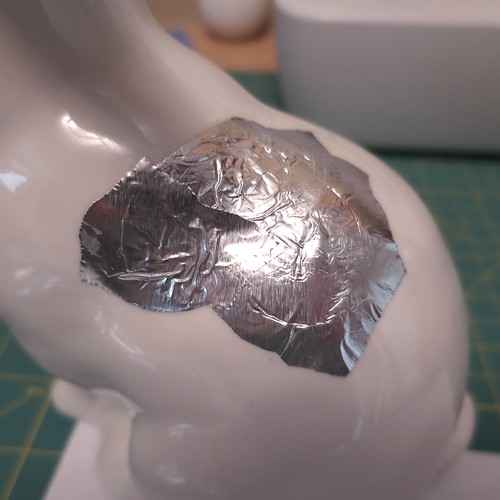
I found that yes the pieces of tin foil will slide around, especially when you are buffing them out. It was much better to let it dry overnight and then buff everything. That way I wasn’t having to go back and fix moved, or even worse ripped, pieces.

Buffing was a little trickier on the bunny because it wasn’t just a flat surface like the egg. I tried using a soft brush, but it really left a lot of scratches on the foil that I didn’t care for. I found that using a the round tip of a metal crochet needle worked really well for getting into details like eyes and toes. I also did a lot of buffing by just rubbing the bunny with a soft cloth and a little pressure. It takes some time to get right, but remember the finished product is supposed to look like an old hammered silver, so you want some texture too it.
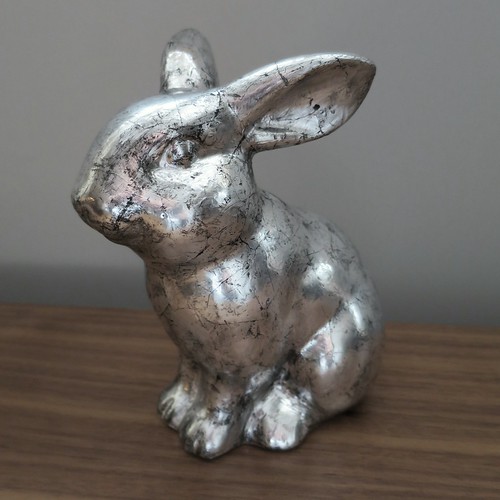
The painting step was also a little tricker to get to look right. First of all, I had used some bigger pieces of foil on the back of the bunny, 1 inch instead of 1/2 inch like I used on the eggs. This left less crevices for the paint to fill and the back looked less antiqued than other parts of the bunny. Secondly, I used Martha Stewart acrylic paint which ended up being a lot thicker than the Creamcoat paint I had used before. The Martha Stewart paint is thicker and was harder to wipe off evenly. I ended up using a wet cloth to wipe it down and watering the paint down for later coats. Lastly, it took me four or five applications to get an antiqued look I liked compared to the two it took on the eggs. It was just harder to get a larger surface to look evenly antiqued. Plus there were the detailed carvings on the bunny which required a little more attention to get right.
All and all, this was still a relatively easy project with a high impact result. I’m already dreaming on things this technique will look beautiful on for Christmas.
© 2005 – 2014 Kathy Lewinski & Susan Cornish

Pingback: Foil Rabbit | Grey Frog Studios