


After I made my grey ombré handwarmers, I wanted to make some mittens with that same sort of changing grey feeling, but not exactly the same.
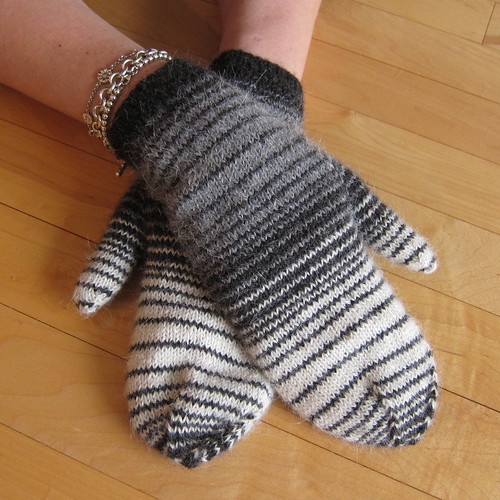
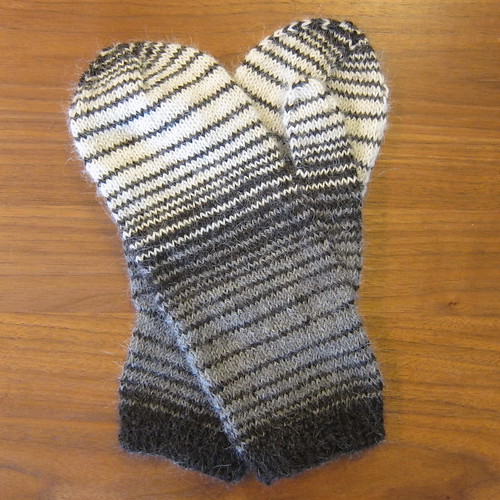
The stripes give a sort of a modified ombré effect moving from grey to dark grey to cream. I really like the way they move from color to color and the different widths of the stripes. The colors remind me of the skies on a wintery day, thus the name.
The mitten itself is a pretty basic mitten shape. The yarn I used, Frog Tree Sport Alpaca, made for a soft, fuzzy, delicate (rather than bulky) mitten. I did a short 1-inch cuff and then started the stripes down on the wrist. Usually, I do a long, 3-inch, ribbed cuff, but I really like how this shorter cuff looks and fits. What makes these mittens is the interesting stripe pattern, a chart makes it easy to follow though.
Winter Skies Mittens

Download the Winter Skies Mittens Pattern and Chart together or just the Winter Skies Mittens Chart. Follow the pattern for construction details and the chart for the color changes.
Size: These mittens are a women’s medium, approximately 7.5 inches around.
Supplies:
Sport weight yarn, I had a 130 yard balls of Frog Tree Alpaca Sport in dark grey, grey and cream. I used about 2/3 of the dark grey and 1/2 of the light grey and cream.
Tools:
Four size 1 needles
Stitch marker(s)
Stitch holder or scrap yarn
Scissors
Tapestry needle
Gauge: 8 stitches and 10 rows per inch
Required Skills:
- knitting and purling in the round on four needles
- following a color chart
- picking up stitches
Abbreviations:
K – knit
P – purl
Kfb – knit into the same stitch through the front and then the back, increasing one stitch
K2tog – knit two stitches together, decreasing one stitch
M1r – pick up the bar between the last stitch you knit and the one you’re about to knit, bringing the needle from the back to the front. Knit into the front of this stitch, increasing one stitch.
M1l – pick up the bar between the stitch you knit and the one you’re about to knit, bringing the needle from front to back. Knit into the back of this stitch, increasing one stitch.
Jogless Stripes: If you have ever knit stripes in the round you know that you get a jog or step at the beginning of a round. There is a way to fix this when you have stripes of more than one round. Finish the first color and knit one round of the second color. When you get to the first stitch of the second round of the second color, pull up the stitch below from the first color on to the left needle. Now knit those two stitches together.
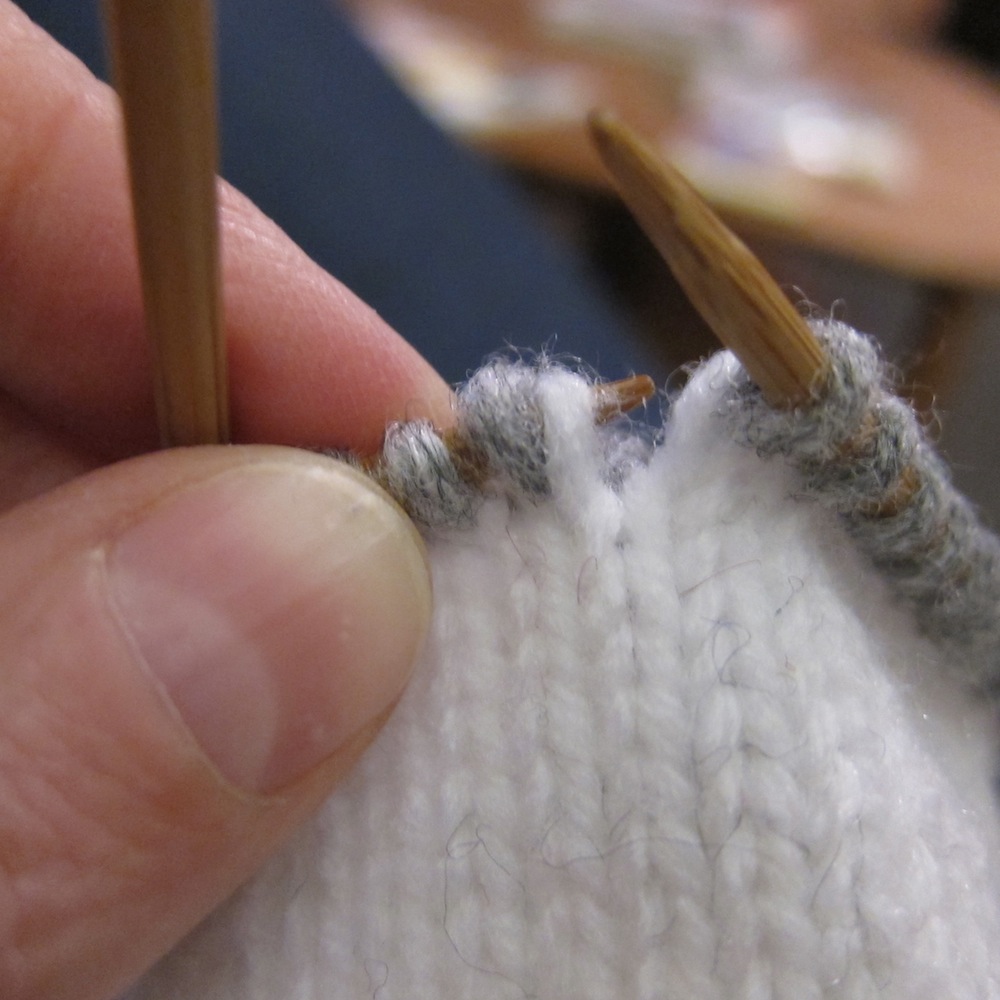
I used this method on these mittens every time I had a stripe of more than one round. Unfortunately, it only works when your stripes are longer than one row. I have not found a good way to fix the jog problem with single row stripes.
Hand:
With darkest color, cast on 56 stitches. Divide between three needles. Join together, being careful not to twist, and place a marker between the first and last stitch to mark rows. Remember to follow the chart for color changes.
Rows 1 – 10: k1, p1 until end
Row 11 – 30: k
Row 31: k18, kfb, k17, kfb, k18, kfb (59 stitches)
Start thumb shaping:
Row 32: k29, m1r, k1, m1l, k29 (61 stitches)
Row 33: k29, m1r, k3, m1l, k29 (63 stitches)
Row 34: k
Row 35: k29, m1r, k5, m1l, k29 (65 stitches)
Row 36 – 37: k
Row 38: k29, m1r, k7, m1l, k29 (67 stitches)
Row 39 – 40: k
Row 41: k29, m1r, k9, m1l, k29 (69 stitches)
Row 42 – 43: k
Row 44: k29, m1r, k11, m1l, k29 (71 stitches)
Row 45 – 46: k
Row 47: k29, m1r, k13, m1l, k29 (73 stitches)
Row 48 – 49: k
Row 50: k29, m1r, k15, m1l, k29 (75 stitches)
Row 51 – 52: k
Row 53: k29, m1r, k17, m1l, k29 (77 stitches)
Row 54 – 55: k
Row 56: k29, m1r, k19, m1l, k29 (79 stitches)
Row 57: k
Row 58: k29, slip 21 stitches on to a stitch holder or scrap yarn, cast on one stitch, k29 (59 stitches on the needles, 21 on a stitch holder)
Row 59: k28, k2tog, k29 (58 stitches)
Row 60 – 90: k
Row 91: k27, k2tog, k27, k2tog (56 stitches)
Row 92: (k12, k2tog)4x (52 stitches)
Row 93: k
Row 94: (k11, k2tog)4x (48 stitches)
Row 95: k
Row 96: (k10, k2tog)4x (44 stitches)
Row 97: k
Row 98: (k9, k2tog)4x (40 stitches)
Row 99: (k8, k2tog)4x (36 stitches)
Row 100: (k7, k2tog)4x (32 stitches)
Row 101: (k6, k2tog)4x (28 stitches)
Row 102: (k5, k2tog)4x (24 stitches)
Row 103: (k4, k2tog)4x (20 stitches)
Row 104: (k3, k2tog)4x (16 stitches)
Row 105: (k2, k2tog)4x (12 stitches)
Row 106: (k1, k2tog)4x (8 stitches)
Row 107: (k2tog)4x (4 stitches)
Cut tail and weave through 4 remaining stitches. Pull the tail inside the mitten and tighten. Weave in ends.
Thumb:
Put the 21 stitches on the stitch holder on three needles. Pick up two stitches from the hand placing a stitch marker between them.
Row 1: k2tog, k19, k2tog
Row 2 – 16: k
Row 17: (k5, k2tog)3x (18 stitches)
Row 18: k
Row 19: (k4, k2tog)3x (15 stitches)
Row 20: k
Row 21: (k3, k2tog)3x (12 stitches)
Row 22: k
Row 23: (k2, k2tog)3x (9 stitches)
Row 24: (k, k2tog)3x (6 stitches)
Row 25: (k2tog)3x (3 stitches)
Cut the yarn leaving a 6 inch tail and weave through the remaining stitches. Pull the tail inside and tighten. Weave in ends.
Copyright 2013 Kathy Lewinski JustCraftEnough.com
Do not duplicate for distribution, repost, sell or teach this pattern without permission.

Pingback: 16 Easy To Make DIY Mittens For Winter