

I’ve been thinking about spring and summer, flowers in the garden, parties on the patio and fairy lights in the trees and bushes. I love the look of fairy lights lighting the night, it makes everything feel dreamy. Since that is where my head has been, I decided to make another version of flower fairy lights. (You can see my ribbon rosebud lights here.) At first I thought of crocheting or knitting flowers to fit around the lights, but I really wanted something that would catch and reflect the lights. My eye caught the painted metal Mexican cross I have in my craft room and realized that was the way to go.
I’m sure most of you have seem the painted embossed metal art that comes out of Mexico. If not here is an example.

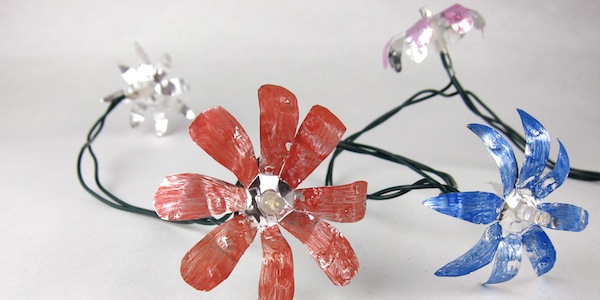
Here is my very simplistic version.
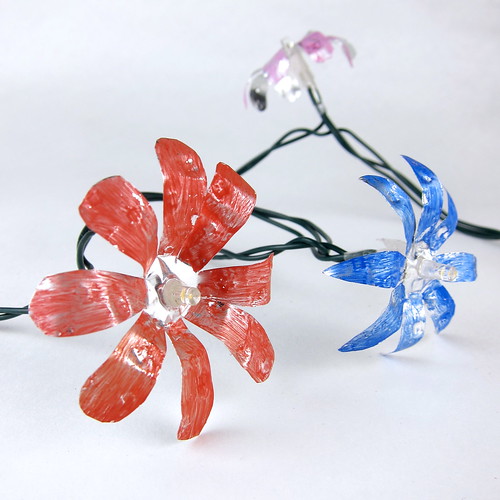
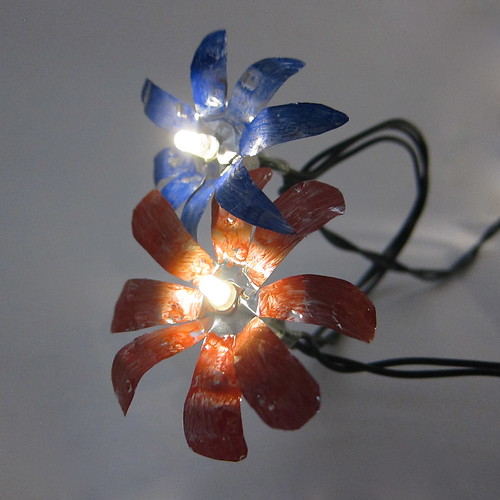
I think they are so cheerful and fun. The tin makes a nice reflector for the lights when they are on a night, helping to increase their glow.
I didn’t have the tools to do real metal working, but I knew I could get a similar look by using disposable bakeware. I couldn’t find bakeware that didn’t have some sort of pattern embossed in it already (I had hoped to do the embossing myself). So, I went with these baking sheets that had a small all over pattern on the bottom.

Tin Flower Fairy Lights
Supplies:
- scratch paper
- disposable tin baking sheets (I got 15 flowers out of one sheet)
- acrylic paint
- fairy lights (I used the tiny led ones. You want the type that don’t get hot)
Tools:
- scissors (do not use your good fabric scissors for this project)
- glue stick
- paint brush
- double stick tape (optional)
1. Draw up a flower or multiple flowers to use as a pattern. (If you aren’t great at drawing find a flower you can use online.) Make sure the flower is big enough for your fairy light to fit in the middle. A flower with petals that separate looks best.
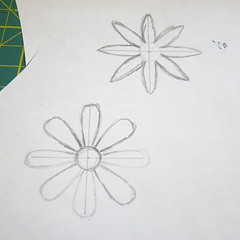
Cut out your patterns. Don’t worry about them being perfect, mine certainly weren’t.
2. Put some glue stick on your pattern a press it on your tin baking sheet. Then cut out around the pattern. Carefully peel pattern off to use again.
3. Use small scissors or other thin pointed object to put a hole in the middle of the flower big enough to just fit your light in.
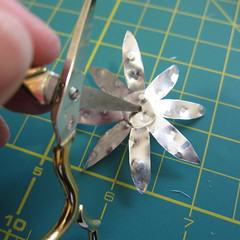
4. Bend the petals up a little from the center and then curl the petal ends down. (This is optional, you could also leave them straight.
At this point you can use the flowers the way they are and just leave them silver or you can paint them.
5. With a dry paint brush and a very little dab of acrylic paint, brush a little color on your flowers leaves. If you put too much paint on it will not adhere nicely.
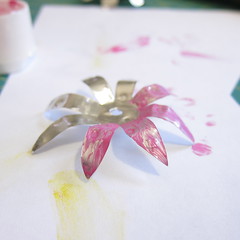
The painting looked very rustic which I actually like. I also like that it isn’t solid so some of the metal still shows through. It stays on pretty well unless you fiddle with the flowers a lot after painting.
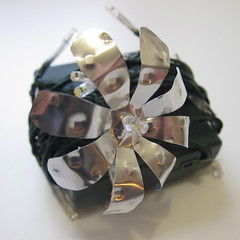
6. This was the step I struggled with the most, how to get the flowers to stay on the lights. At first, they seemed to stay in place just by making the hole just big enough and slipping the flowers on, but that didn’t work every time. What I ended up doing was wrapping a little double sided tape around the light where I wanted the flower to sit. To make it extra secure I wrapped another thin piece of tape behind the flower too. The tape also insures the metal flowers aren’t touching anything metal on the lights, just incase.

They are secure enough to hang and not fall off, but I wouldn’t put them out in a strong wind. If I had it around, I would have used something like the blue tac you use to hang things on the wall to secure the flowers to the lights instead. I’d love to hear if anyone has any other ideas for securing the flowers around the lights.

Can’t you see hanging a whole bunch of these for a Cinco De Mayo party? A mother’s day brunch? Or garden party?
© 2005 – 2013 Kathy Lewinski & Susan Cornish

5 Comments to Project: Metal Flower Fairy Lights