Ready, Set, GO!
This week we will be doing some ground work, making sure that the foundation is laid for our success.
- Measure your favorite piece
- Compare with the pattern
- Measure your gauge swatch
- Pick the correct size
- Cast-on
- Start knitting
Knitting a sweater is a scary proposition, really. When would you ever spend $100-$200 on something you had not tried on? Few of us would. So we will take steps to make sure that you LOVE what you make. And to do this, we are starting off in the direction of a favorite piece you have already.
Take a sweater or a fleece that you love the fit of and lay it out. Now, get out a tape measure and measure it.
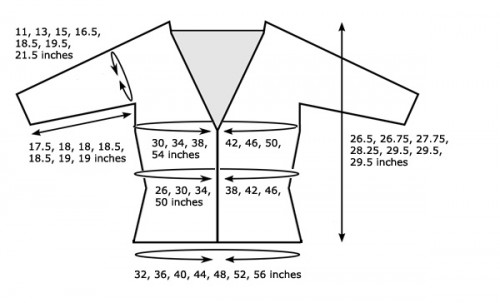
The schematic below is a great example of the finished measurements that (hopefully, normally) come with a pattern. This one is for “The Shapely Boyfriend Sweater” by Stefanie Japel.
(note: if your pattern does not come with a schemeatic, then check back with us tomorrow and see Kat’s post on how to create a schematic of your own.)
 Take the measurements of your sweater, and compare them to the pattern you are proposing to do. Check to see if the dimensions are similar, in the bust, waist and hips.
Now – three things will come together here to create the perfect starting point.
- Your “ideal” garment measurements
- The swatch and your gauge
- The measurements given in the pattern you are using
Use your gauge swatch and measure your stitches across 4 inches. Then divide by 4 for your stitches per inch. Make sure you are getting what the pattern calls for. Then pick the size that best corresponds to your favorite garment.
If you are getting too few stitches per inch (knitting too big) make your needle size smaller, and work another gauge swatch. OR if you like the look of the fabric, see what will happen if you go DOWN and follow the directions of a smaller size. (your sweater will come out bigger than the measurements for the smaller size.)
If you are getting too many stitches per inch (knitting is too small) go up a needle size and gauge another swatch. OR, if you like the look of a tight knit garment, then look at the next size LARGER, and see if you knit the larger size, you will get your size because your stitches are smaller.
If you are going to go up or down a size – please measure carefully. This is where the “too tight” or “too baggy” issue will rear it’s ugly head in the final garment.
A note about gauge, and swatches. Sometimes when people knit their swatches, they try to knit a certain way. “I know I’m a tight knitter, so I will knit loosely”. The issue is that if you “try” to knit a certain way that is not natural to you, it will back fire. You cannot keep up one gauge consistently for the whole project. If you still need more information about gauge – have a look here.
And keep in mind, there is no judgement implied in gauge. If you are a tight knitter, or a loose knitter…there is no “better” or “worse”. Whichever you are, the important thing is constancy. And then, do accurate math with what ever tension you have.
The term “ease” in knitting is used to describe how much extra fabric you will have around your body. So a sweater with zero ease is clinging to your body. A sweater with 4 inches of ease will hang away from your body a total of 4 inches. (so you could wear a shirt under it and the shirt will not bunch up.) And 8 inches of ease would fit like a “boyfriend” (or a husband) sweater. More than 8 inches would give you a style similar to a swing coat. And on the opposite end of the spectrum, zero ease is right on your body. Ironically “skin tight” is actually “negative ease”. (there is no end to the puns)
One thing that I do is to make a photocopy of my pattern. I put it in a sheet protector and carry that around instead of the whole book/magazine. When I figure out what size to make, I circle those numbers in the pattern. And If I do anything different than what the pattern calls for, I note that on the paper as well.
Week 1 Assignments:
- do a gauge swatch
- identify and measure your favorite piece (that will be a model)
- compare the measurements to the schematic information you were given
- choose your size
- obtain the appropriate needles (in case you did swatches on some needles that will not accommodate the body of a sweater.)
- Cast on
- Start knitting!
- Optional: photocopy the pattern, and put it in a plastic sleeve
The real “work” this week is just getting good measurements and starting off in the appropriate size. So there is not a HUGE amount of knitting here. Take your time to do first 5 steps carefully. Then, as much knitting as you get done – all the better. We are starting at the top, so try to get the cast on, and as much knitting done as you can. We all have different sweaters, but let’s say down to the shoulders? Or 5 inches. Or just as far as you can.
Please write us and share your progress or questions. We would love to see your work! You can put them in our Flickr group, on our FaceBook page or just leave us a comment.


