
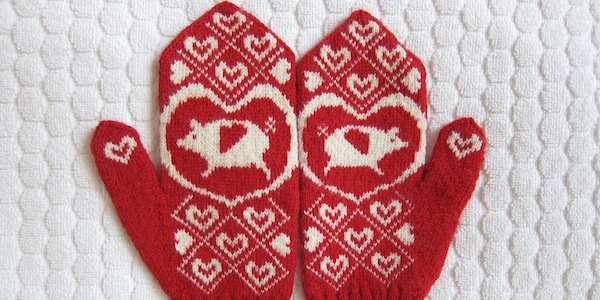

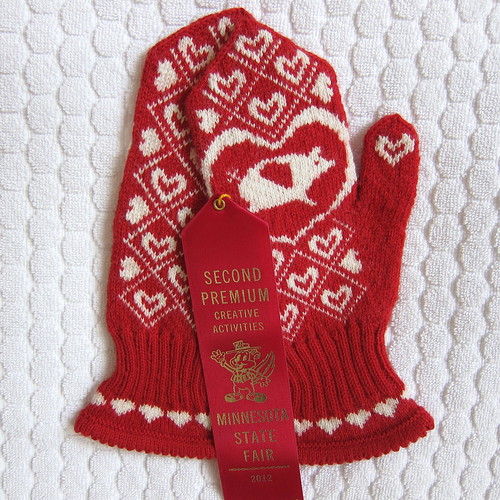
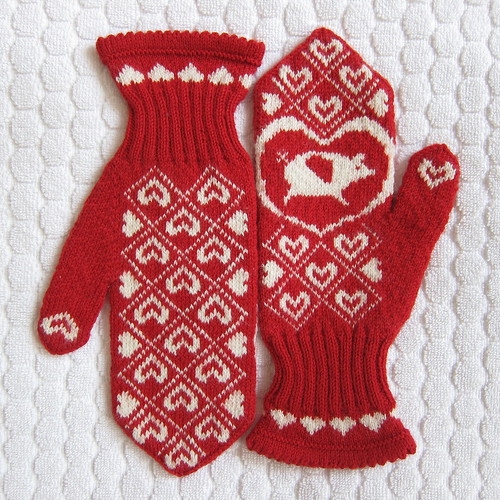
You know what they say about when pig fly? That’s how I felt about my chances of ever getting a ribbon at the Minnesota State Fair. Well, these flying pigs certainly removed those doubts.
Hearts are a pretty traditional pattern in Scandinavian patterns, the addition of the pigs adds a whole lot of whimsy.
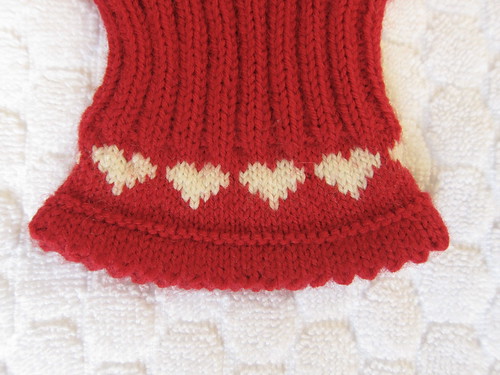
Since these were for competition I wanted to do something special for the cuff, so I added a hemmed picot edging and a band of pattern before the ribbing. The hemmed edge gives a very neat finished look.
Let’s review my tips on working with multiple colors.
- Your yarn will get twisted. I found that letting it untwist after every few rows saved my sanity. Yes, it adds a little time to your knitting, but it’s so worth it.
- Twist your yarns together every third or forth stitch. This will keep you from having long floats, keep a more even gauge and a have a neater inside.
- Vary where your twists are from row to row. When you do a twist in the same place over multiple rows it has a better change of showing through to the front.
- Do not twist your yarns at the stitch markers on the row before you will do an increase for the thumb. The increases are made by picking up the yarn between the stitches. If you twist here is it is really hard to get the yarn to pick up.
- Do not twist your yarns between the decrease for the top of the hand and the thumb. I twist here has a tendency to show through to the front of the mittens when worn.
Flying Pig Mittens
This pattern makes a woman’s size 8 mitten.
Download a pdf version of the Flying Pig Mittens Pattern
Supplies:
- Sock weight yarn in red & white or off-white, 1 ball about 260 yards each
- 4 double-pointed needles in size 2 & size 1 (or sized needed to get gauge)
- 3 stitch markers
- tapestry needle
- scrap yarn
Abbreviations:
- K = knit
- P = purl
- K2tog = knit two stitches together
- Pm = place maker
- Sm = slip maker
- M1r = make one right
- M1l = make one left
- Ssk = slip slip knit
Gauge: 9 stitches and 11 rows per inch
Cuff:
Using smaller needle, cast on 72 stitches. Divide between 3 needles. Join together to form a circle. Place a stitch marker to mark end of row.
Rows 1 – 4: Knit
Row 5: *k2tog, yo repeat from * until end of round
Rows 6 – 9: Knit
Row 10: Fold the cuff inside at row 5, pick up the edge of each cast on stitch and knit it with the corresponding stitch on the needle making a hemmed cuff.
Row 11: Purl
Rows 12 – 14: Knit
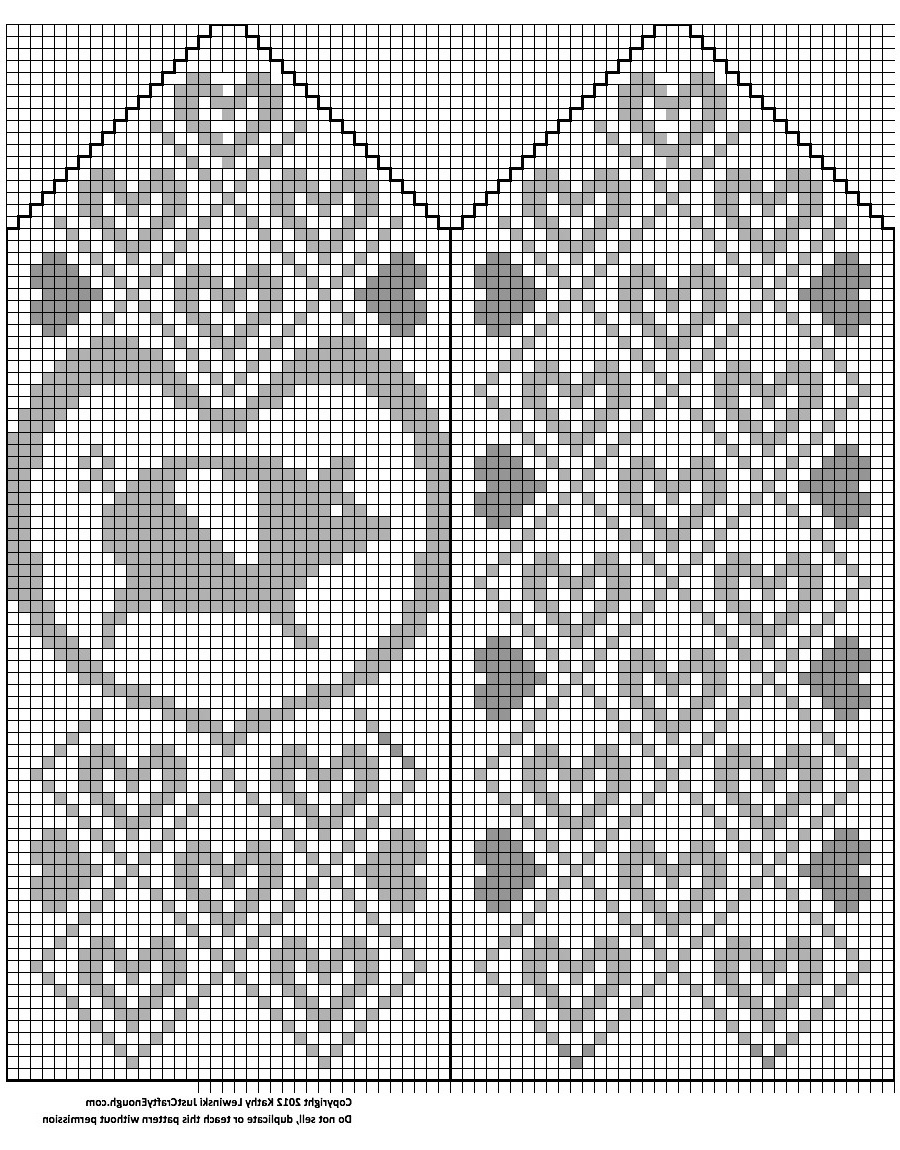
Rows 15 – 20: work cuff chart

(To make any of the charts larger click on the chart and save it to your computer. Then you can zoom in.)
Rows: 21 – 23: knit
Start working in k2, p2 until desired length.
Hand:
Change to bigger needles.
Follow the directions below while following hand chart for the colorwork pattern.

Row 1: Kfb, k23, kfb, k23, kfb, k23 (75 stitches)
Row 2: Knit 37, pm, m1r, k1, m1l, pm, k37 (77 stitches)
Row 3: Knit
Row 4: Knit 37, sm, m1r, k3, m1l, sm, k37 (79 stitches)
Row 5: Knit
Row 6: k37, sm, m1r, k5, m1l, sm, k37 (81 stitches)
Rows 7-8: Knit
Row 9: k37, sm, m1r, k7, m1l, sm, k37 (83 stitches)
Rows 10-11: Knit
Row 12: k37, sm, m1r, k9, m1l, sm, k37 (85 stitches)
Rows 13-14: Knit
Row 15: k37, sm, m1r, k11, m1l, sm, k37 (87 stitches)
Rows 16-17: Knit
Row 18: k37, sm, m1r, k13, m1l, sm, k37 (89 stitches)
Rows 19-20: Knit
Row 21: k37, sm, m1r, k15, m1l, sm, k37 (91 stitches)
Rows 22-23: Knit
Row 24: k37, sm, m1r, k17, m1l, sm, k37 (93 stitches)
Rows 25-26: Knit
Row 27: k37, sm, m1r, k19, m1l, sm, k37 (95 stitches)
Rows 28-29: Knit
Row 30: k37, sm, m1r, k21, m1l, sm, k37 (97 stitches)
Rows 31-32: Knit
Row 33: k37, sm, m1r, k23, m1l, sm, k37 (99 stitches total, 25 stitches between markers)
Row 34: k37, put stitches between makers on a scrap piece of yarn, pick up one stitch, k37 (75 stitches on needles)
Row 35: k37, k2tog, k36 (74 stitches)
Rows 36-71: knit
Row 72: ssk, k33, k2tog, ssk, k33, k2tog (70 stitches)
Continue decreasing in this manner (the amount of stitches between the decreases will be two less each row) until 6 stitches remain. Cut the yarn leaving about a six-inch tail. Put the tail on a tapestry needle. Weave through 6 remaining stitches. Pull tight. Weave tail inside.
Thumbs:
I chose to carry the white yarn throughout the whole thumb even though it wasn’t used until the top. This kept the whole mitten the same thickness.
Row 1: Put the 25 thumb stitches on the larger needles. Knit. Pick up and knit two stitches from the hand. Place round marker to mark end of round.
Row 2: k25, k2tog (26 stitches)
Row 3-11: knit
Row 12-20: knit while following chart

Row 21: ssk, k9, k2tog, ssl, k9, k2tog (22 stitches)
Continue decreasing in this manner until four stitches remain. Cut the yarn leaving about a six-inch tail. Put the tail on a tapestry needle. Weave through 6 remaining stitches. Pull tight. Weave tail inside.
Make the second hand:
Follow the directions above, but work the chart below instead.
Copyright 2012 Kathy Lewinski JustCraftyEnough.com
Please do not sell, duplicate for distribution or teach this pattern without permission.
© 2005 – 2012 Kathy Lewinski & Susan Cornish

Pingback: Flying Pig Mittens | Crafts: Unknown Knowledge | Scoop.it
Pingback: Manoplas III | La Maison Bisoux
Pingback: Mittens / Moufles | Knitted Art
Pingback: 16 Easy To Make DIY Mittens For Winter
Pingback: Free Pattern: Knit Flying Pig Mittens – Knitting