

This week on Iron Craft we were asked to make something using stars or stripes in honor of the Fourth of July. It did not literally have to be something for the Fourth but, since I was hosting the holiday barbecue I decided to make a decoration for the patio. One side of our patio is the wall of our garage, basically a big empty stucco wall. I decided to jazz it up with a little patriotic bunting.

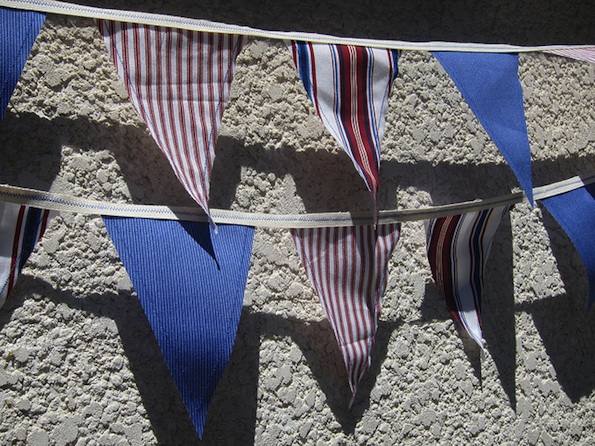
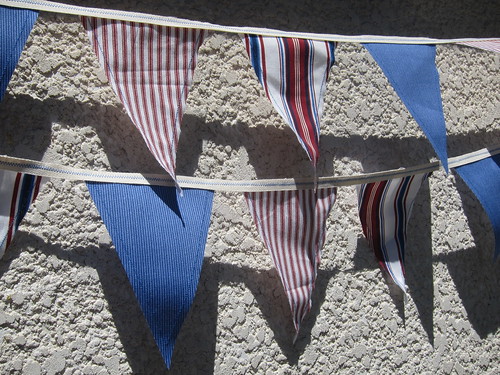
I had a hard time fabrics that I liked at first. I wanted stripes but couldn’t find any bold ones with the right colors. Then I stumbled into the canvas area of Joann’s. I love the color palette that I ended up with with the bricky red, dark blue, ecru and a denim blue.
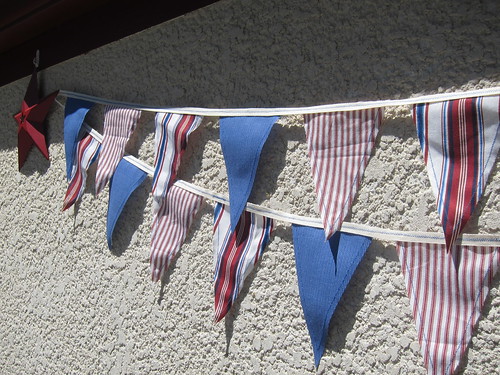
The stars are wooden home decor that I discovers for $6.00 each, also at Joann’s. I thought I was going to have to use some cheap shiny metal ones but, these were a perfect match to the red trim of our house.
So, here’s how I whipped up this quick bunting. Of course, you can do it in any color with any decorative shape as the corners.
Stars and Stripes Bunting How-To
(this will make a bunting that is approximately 7 feet long.)
Supplies:
1/4 yard of 3 different fabrics (I used decor and outdoor canvas which have a little weight and don’t fray too easily.)
Ruler
Pencil
Scissors
Rotary Cutter (optional)
Thread
Sewing Machine
16 feet of 1/2-inch wide cotton tape
Pins
Super Glue
Hanging stars or other shape to attach bunting to
1. Square off one long side of your fabric.
2. Measure and mark with the ruler and pen triangles that are 6″ long on their base and 8″ long to the point. You want to use your squared off side as you first base. By alternating the triangles you should get at least 8 of each color.

3. Cut using scissors or rotary cutter.
4. Using your sewing machine sew a zig-zag (or decorative stitch of your choice) along the long sides of each of your triangles about 1/4 inch.
5. Cut the cotton tape in half.
6. Starting at the middle of one of the pieces of cotton tape pin your triangles on spacing them about 1 inch apart. You want the tape to be on the top of the right side of the fabric. Put twelve triangles on the tape. Repeat with the second tape and remaining triangles.
7. With your sewing machine, attach the triangles to the tape by sewing a zig-zag stitch down the center of the tape.
8. Super glue the ends of the tape to the back of the hanging starts. Make sure the strings aren’t twisted when you glue on the second side. I found it helped to lay it out on the floor to make sure everything was flat. My upper string was about 1 inch from the star tips. You’ll want to leave more tape at the ends of the bottom string of bunting so it hangs lover, 3 or more inches.
9. Once the glue is dry, hang and enjoy. We used those 3M Command Hooks that stick up but come off easily when you’re done. There is a wooden trim under our gutters which was the perfect place to hang the bunting.
Check out the easy Stars and Stripes Table Runner I made to match the bunting too.

One Comment to Iron Craft Challenge #27 – Stars and Stripes Bunting