

This week on Iron Craft I challenge everyone to make something using a fat quarter of fabric. They could use any other craft supplies in the project but only 18″ x 22″ of fabric. For my project, I originally thought of covering the lampshade in my craft room with some cute fabric but, that just seemed a little boring. Then I realized what I really needed was a pincushion. I have a sweet one that was a gift from Susi.
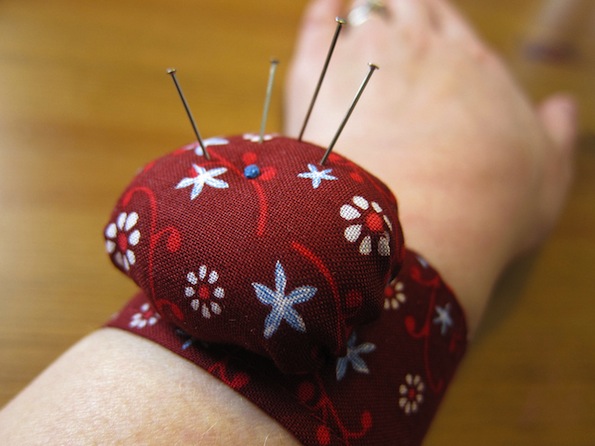
But I tend to keep that one in the craft room . The problem is when I’m sewing downstairs on the couch, which is where I tend to do a lot of my hand piecing for quilts, I end up using the couch, throw pillows & even my clothes as pincushions. Matt was finding pins everywhere & I ended up sitting on a needle in the couch the other morning. I didn’t need anything too big, just enough to hold a couple of pins & a needle. Then I thought of how convenient it would be if it was right there at hand all the time, or right there on my wrist.
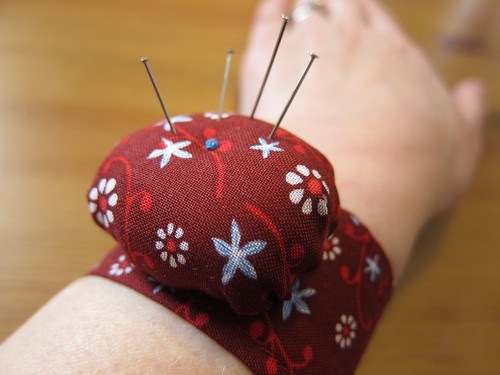
This was such a quick project! An average sewer with a sewing machine could finish it in about an hour or so (even sewn by hand this wouldn’t take long). It’s a great project to use up scrap fabric. Plus, I think it turned out really cute & would make a great present for other crafters & sewers. I was a little worried it might be annoying to wear but, I’ve worn it for two evenings while quilting, it was so handy & comfortable! The trick is to make sure the strap fits tightly so it stays in place on your wrist.
Wristband Pincushion How-To
Supplies:
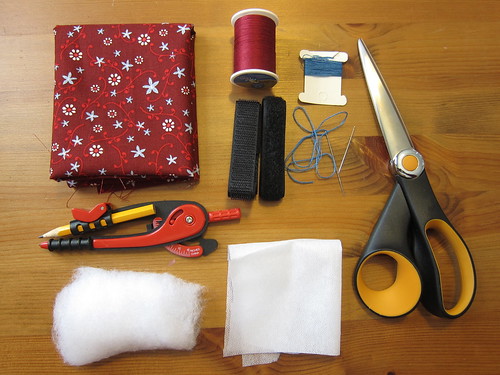
13″ x 5″ of medium or heavier weight fabric (I used quilting cotton) (you want the length of the fabric to be on the grain*)
matching sewing thread
complimentary embroidery floss (optional)
fabric scissors
sewing & embroidery needles (embroidery needle is optional)
velcro
compass (or something that is a 4″ circle to use as a template)
stuffing (polyfil, roving, etc…)
fusible interfacing (I used a medium weight)
Make the Wristband:
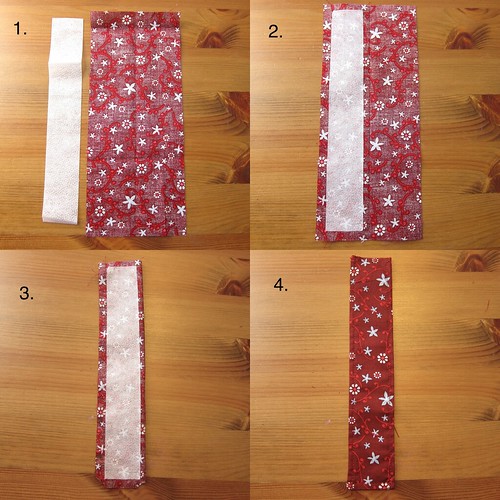
- Cut out a strip of fabric 8 1/2″ long by 3 1/2″ wide. You want the long edge of the strip to be on the grain* so the wristband won’t stretch. Cut a piece of interfacing that is 8″ long by 1 1/4″ wide. (I have a 6″ wrist & this was the right size for me. You may want to adjust the length for a larger or smaller wrist which means you may need a little more or less fabric.)
- Iron the interfacing centered on one half of the fabric strip as shown in picture 2 above. I find it helped to iron the fabric in half first so I had a center line.
- Fold the wristband in half, right sides together. Sew one short side & the long side with a 1/4″ seam allowance. Clip the corners of the sewn short side if you wish.
- Turn the wristband right side out. Iron the open side under 1/4″ & sew shut with a blind or whip stitch. Press. At this point I top stitched around all the sides for a neater look but this is optional.
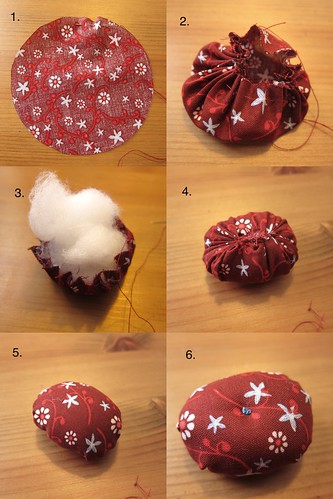
- Use your compass or circle template to draw a 4″ circle of fabric. Cut it out. Using your matching thread, baste around the edge of the circle, about 1/4″ in.
- When you pull the basting thread the circle forms a little pouch.
- Stuff the pouch with filling. You want to stuff is as tight as you can.
- Pull the basting thread as tight as you can & then sew back & forth over the seam to close the cushion.
- You have a finished pincushion. When I was sewing mine shut in step 4 I shaped it a little to get an oval but a circle will work well too,
- I embellished my cushion with some french knots made of embroidery floss. This also helped make for a tighter pincushion. Use 3 strands of embroidery floss & an embroidery needle. Come up from the bottom of the cushion & make a french knot at the top center of the cushion. Go back down through to the bottom & pull as tight as possible & knot off. I didn’t think my knot was big enough so I did a second.
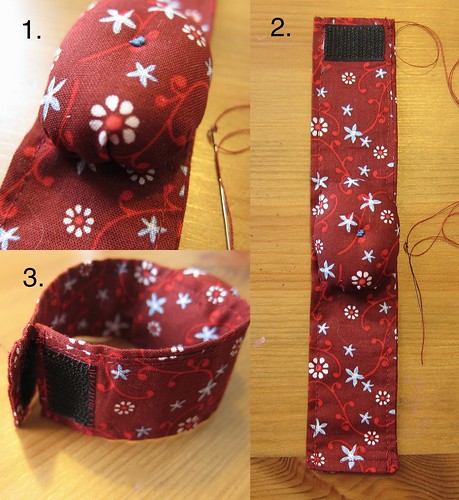
- Using the matching thread sew the pincushion to the center of the wristband. I went around twice to make sure it was tightly on.
- Cut two piece of velcro about 1/4″ shorter than the wristband & sew them on. I attach them with a little fabric glue first to help hold them on but, it;s not necessary.
- If you don’t want to see the stitching on the velcro on the outside of your wristband only sew through one layer of the fabric.

Get sewing with the handiest pincushion around!
* How do you know which way the grain runs on your fabric? The grain runs with the selvage so, if you have a selvage edge it’s very easy to figure out. If you don’t, try grabbing two opposing edges of the fabric & pulling. If the fabric stretches that is not the grain, if it doesn’t stretch that is the grain.

8 Comments to Iron Craft Challenge #10 – Wristband Pincushion