
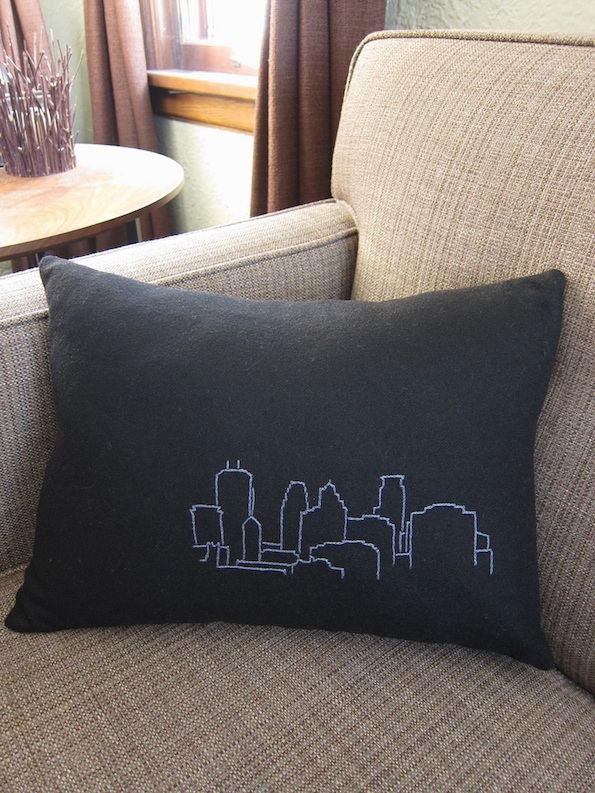

For this Iron Craft challenge I asked everyone to create something inspired by the place they call their hometown. While I didn’t grow up in Minneapolis, I consider it my hometown. It was the city I first moved to on my own after college & the biggest city I had ever lived in. I remember driving back from weekends with my family & the skyline coming into view. I’d feel so thrilled that I actually lived in such a place. Since that time, I’ve lived in bigger cities with grander skylines but, I’ll always have a soft spot for the one here in Minneapolis.
I’ve had the idea for this pillow for quite awhile so, choosing this challenge was just a little bit selfish. I’m glad I did though ‘cuz I’m really happy with how it turned out. I’ve even thought of perhaps doing a series of different cities to sell on Etsy. Though really, it’s simple enough that even a beginning stitcher could easily make one of their favorite skyline.
Embroidered Skyline Pillow How-To
Supplies:
1/2 yard of fabric for background (I used a nice suiting wool)
scissor
dressmakers tracing paper
straight pins
embroidery hoop
1 skein embroidery thread
embroidery needle
thread to match background fabric
sewing needle
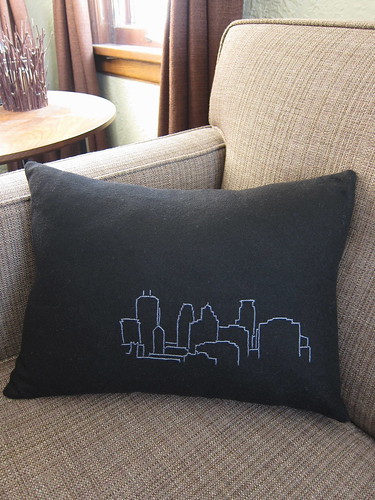
pillow insert (I used a 12″ x 16″ insert. You should have a fabric to do a pillow up to 16″ x 16″)
1. Cut two pieces of your fabric the exact size of your pillow insert with no additional seam allowance. This means I cut mine to 12″ x 16″. I find that this gives you a really fully stuffed pillow.
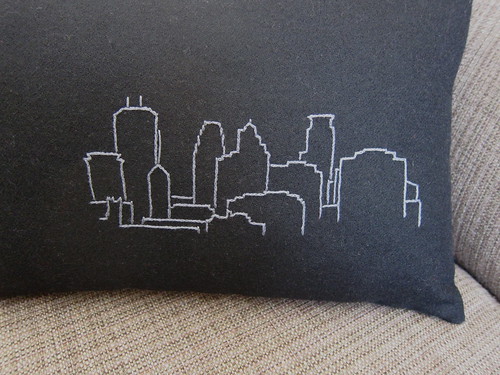
2. Find a picture of the skyline you want to embroider. Trace the outline of the buildings on to another piece of paper so I can see what it will look like without all the other stuff in the picture. I tried to not have it too detailed as that would be hard to do in stitches. My picture was the exact size I wanted but you may want to enlarge your’s in a copier is needed.
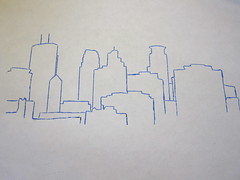
3. Place your skyline drawing where you would like it on the right side of one of your pieces of cut fabric. Pin it at the top & one side to keep it in place. Slide the tracing paper underneath & draw over your lines to mark the design on your fabric. (A stylus for a PDA works great for this. A pen is fine too just be careful not to break through the paper & mark the fabric with it.) Lift up a corner to make sure all your markings have come through & redo any that need darkening.
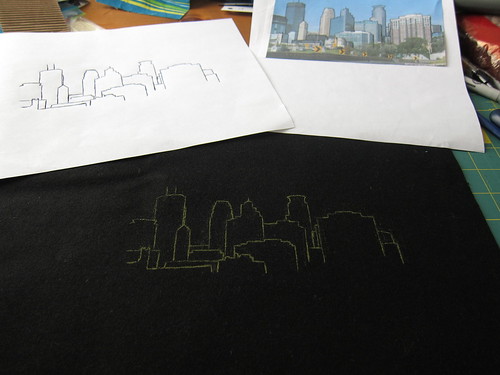
(Just a note here. I use dressmakers tracing paper all the time for embroidery patterns with great results. It typically stays on while I stitch & washes off easily if I can see any when done. Plus the red & yellow are great on dark fabrics. I had a really hard time this time though because of the nap of the fabric the trancing really flaked off as I was stitching & towards the end I was left basically free-handing the buildings.)
4. Place into an embroidery hoop & stitch design. I like to use a hoop bigger than my design if possible so that it doesn’t rub off the design. I used a simple split stitch with a few straight stitches for antennas. I think simplicity looks best here. When I’m done I put a little dot of fabric glue or fray stop on any knots at the back of my embroidery just to make sure they don’t come undone. Press the embroidered fabric to remove all marks from the embroidery hoop.
5. Make the pillow: Pin to the other piece of cut fabric, right sides together. Sew three sides together with a 1/2 inch seam allowance. Then just around the corners on the fourth side, leaving an opening for the pillow form to slip in. I like to backstitch at the corners for extra strength. Clip the corners, turn right side out & press if needed. Slip insert in, making sure to work it into the corners. Blind stitch the open side shut. (I went the simple route with this pillow & made one that is closed on all sides. If you want to make one that has an envelope closure you can take the pillow in & out of here’s some instructions.)
© 2005 – 2011 Kathy Lewinski & Susan Cornish

Pingback: Friday Link Love at theinbetweenismine.com
Pingback: Travel inspired DIY’s | Afterglobe
Pingback: Månadens måste: brodera en skyline | broderamera