


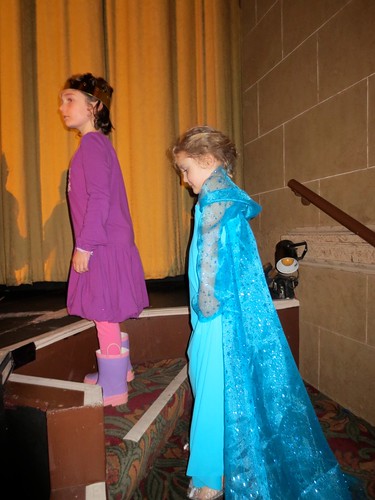
I recently had my own private Project Project Runway challenge where I designed and sewed a Frozen Elsa dress in less than 24 hours. (4 hours in total) You can see the Sing Along event we went to here, it was amazing. What I would like to do is offer the details that will give you the power to make your very own gown.
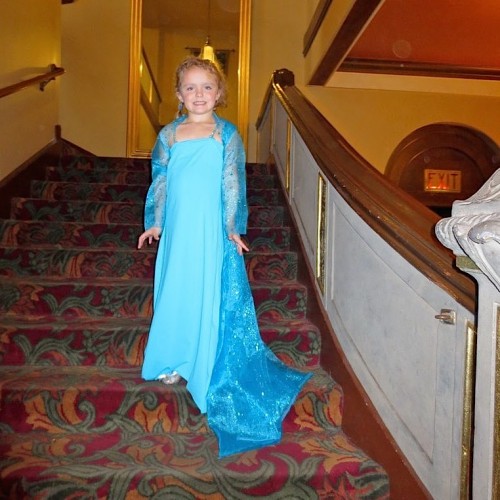
Elsa Princess Dress
This pattern scales beautifully, so you could theoretically make any size. Bonus!
Supplies:
- 1.5 yards of stretchy fabric. (The one we used was kind of a thick bathing suit fabric.)
- 2 yards of the sparkiest fabric available (For my client, the sparkle was MUCH more important than the color.)
Note: these fabrics do not have to be a matched set. They don’t even have to be the “right” color. They just need to reference the “ice” aspects of the dress. With that in your mind, the fabric selection will be SO much easier.
- thread to match
- ribbon or rhinestone trim (for straps.)
- about 12 inches of elastic (Color is better, but white could be hidden)
Tools:
- sewing machine
- serger (optional)
- fabric scissors
- a work area that is going to survive the glitter that is about to RAIN down
- measuring tape/ruler to help with cutting
You will work in two pieces : the dress and then the “robe”.
The Dress:
This is a simple tube. Measure your “client” around the chest. That is the top measurement.
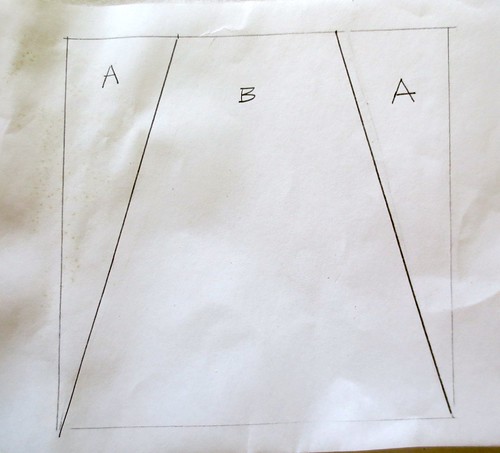
You will cut two bells from the bathing suit fabric (remember the top of the bell is the top measurement). It is important to have enough fullness to allow the model to walk comfortably, but not so full that they risk tripping. I cut the front “flat” (the bell shape was much less pronounced) and the back had more of a flair. I made the front a little bit higher, so as to expose the shoes and avoid tripping, The back was just slightly longer.
Pin the sides of the bells together, right sides facing each other) and sew them. (If you have a serger, here is a great time to use it. Be sure to keep the pins WAY back from the serger’s path.)
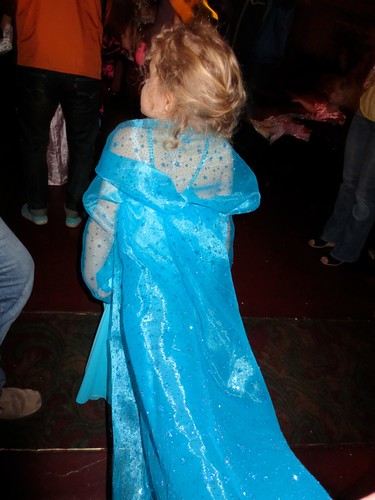
For added structure and for modesty, I sewed a tube that fit around the chest and rib cage to fit inside the dress as a lining. I sewed this about an inch tighter than the dress and I added it to the top of the dress and folded it under. It was a good idea, but this fabric was so slippery that it just slid back on itself. It reminded me of one of those water snake kids toys. I tried sewing the side seams together inside, but there was still some real rolling. In the time frame that I was working with, straps were the quickest and best way to correct this problem.
The Robe
Beware: if you are using glittery fabric, take any and all precautions you need to here to keep the glitter contained. Use craft scissors, use painters tape and plastic to mask off the doors to your work space. Get out your hand held vac. Really find your happy, chilled out place, because everything is about to be COVERED in glitter. (I am only kidding about masking off the door.)
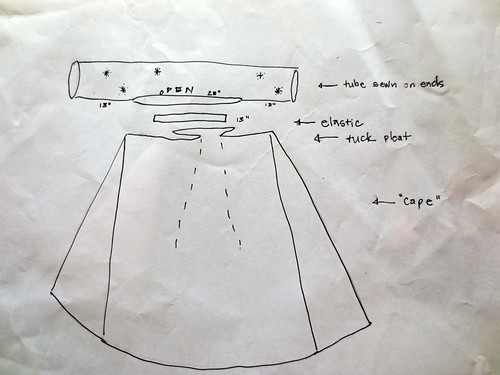
For this section, you will cut a long piece of fabric off the top of your yardage. Fold it wrong sides out, and sew in 13 inches on each side. That leaves a hole in the middle of the tube (23″). Essentially here you have made a bolero.
Take half of the chest measurement and cut a piece of elastic that length. (this would be long enough to go across the princess’s back. On our dress, the elastic band was 13″.) Stretch that elastic, and sew that across the bottom seam of the open part of the bolero. When the elastic is stretched, it will act to gather the fabric as you sew.
To make the cape part, I had almost a perfect square left.
I cut long triangle down the sides of the square, turned those upsidedown, and sewed them to the sides, creating a fuller cape in the back.

I cut the hem line to gently round off the bottom of the cape.
In the back, I attached the cape/train to the bolero with a big pleat (rather than gathering it all the way across.) This gave it a more striking geometric feel, rather than a gathered look.
For this whole look, in the time frame I was given, nothing was hemmed. For the fabric we chose, this worked out really well.
© 2005 – 2014 Kathy Lewinski & Susan Cornish

7 Comments to Project: Frozen Princess Dress