

(For the 24 weeks leading up to December 1st, we’ll be making a Christmas ornament. Each one will be traditional to or inspired by a different country)
Let’s head to Poland for this week’s Christmas ornament.
The Christmas season in Poland start with Advent. Families get together and bake piernik (gingerbread) in shapes like hearts, animals and St. Nicholas. “Gwiazdory” or star carriers walk through villages singing carols, putting on puppet shows and acting out Nativity scenes. Christmas Eve is a day of fasting, but once the first star is visible family and friends sit down for a feast called Wigilia, featuring carp.
Christmas trees are decorated with wrapped candy, glass ornaments, lights, tinsel and handmade paper ornaments. For our ornament we are making a Jeżyk, also known as a Polish Porcupine Ball (though jeżyk actually translates as hedgehog).

The origin of this craft is lost, but according to the Polish-American Journal, a flood of cheap German ornaments in the mid-19th century resulted in a backlash by enlightened society and artists. Maria Gerson-Dabrowska, a writer, painter and sculptor, led a public demonstration on the making of many traditional Polish ornaments in 1911 at the offices of a children’s magazine. She explained that ornaments based on the art in traditional Polish farms would create more of a national tree. The transition was successful and now the making of homemade ornaments is a part of many school curriculums and a popular family activity during Advent.
This ornament is a little fiddly to make, but once you get the hang of rolling the paper it comes together quickly. I did mine out of plain white computer paper, but have seen pretty ones made from foil and patterned papers. You don’t want to use too thick a paper as it won’t roll nicely.
Jeżyk (Polish Porcupine Ball)
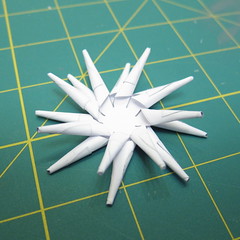
My ball is made of 12 stars which I thought gave a good full look. I’ve seen them made with just 10 and heard of people using as many as 30 (though I can’t imagine how full that is!).
Supplies:
- paper
- glue (you want a glue that adheres quickly like tacky glue)
- fine glitter (optional)
- embroidery floss, yarn or thin ribbon
Tools:
- scissors
- small pointed object like a skewer or knitting needle (I used a size 3 knitting needle) (I’ve seen this done with a pencil usually, but though that was too big for the size ball I was making.)
- small paint brush (optional)
- sharp needle with a large eye
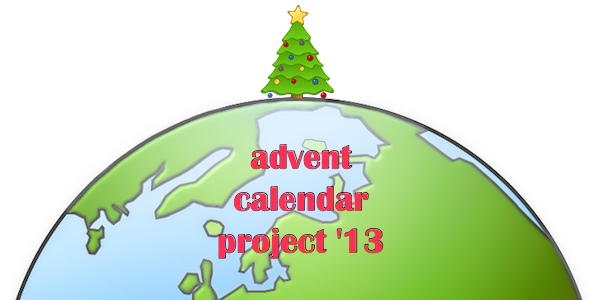
1. Draw out a circle and divide it into an eight piece pie. Cut the pie slices leaving about 1/2″ in the middle uncut.
You can also just download my Porcupine Ball Template. It has 2 1/2″ circles.
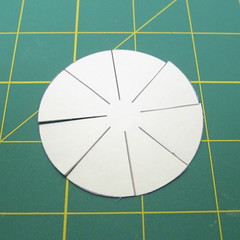
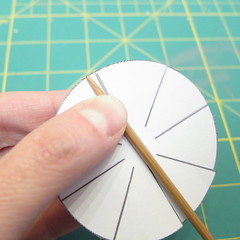
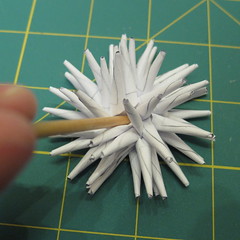
2. Hold your skewer or knitting needle against the side of one of your “pie” pieces with the pointed end facing out. Roll the piece up so it has a point at the tip. I couldn’t get my tips completely pointy, but I thought it still looked fine. Put a small dot of glue on the end of the rolled section to hold it together.
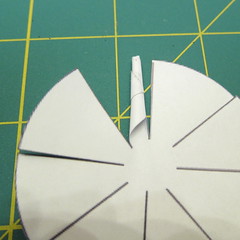

Continue folding until all the “pie” pieces have been rolled. Roll all your pieces the same direction. I found it helped to hold the paper and knitting needle at the tip as I rolled. Keep in mind the part at the tip will be tight to the needle, but not the rest of the cone. It took a few practice rolls for me to get the hang of it. Roll all the circles into stars.
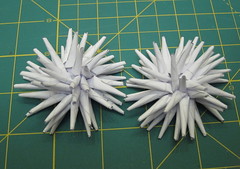
3. Now it’s time to put your stars together to form the ball. Most versions I’ve seen of these are sewn together. Let me tell you, I tried that and it was just too tricky to get the stars tightly together, so I thought why not just glue them together?!
Put one star down, cone side up. Put some glue in the middle. Place another star on top of it with the cones also facing up and offset from the first star. Press the middle down to adhere.
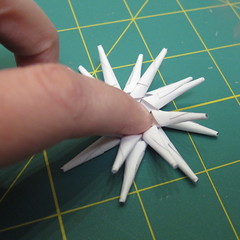
Continue with four more stars. You may need to press from both sides to get them to really stick. For the final star of the six I used my knitting needle to help push the middle in because it was too small for my finger.
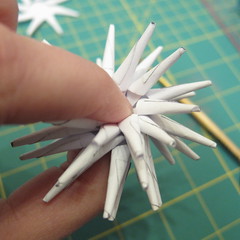
Repeat with the second six stars. So, you’ll have two half balls. Let dry.
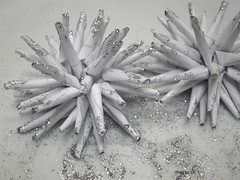
4. This step is optional. I wanted to add a little sparkle to my ball, so I used a paint brush to put a little glue on the tips of the points and sprinkled them with some fine glitter. I like the look, but think I need to go back and do more.
5. On the flat side of one of your half balls put a dot of glue in the middle. Glue the second half ball to it making sure to offset your points. I used my knitting needle to help press it together. “Fluff” out your points as needed. Let dry.
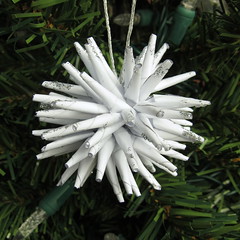
6. Cut a length of embroidery floss, thin yarn or ribbon about 8″ long. Knot it two or three times in the middle. Put one end of the floss on the needle and put it through the center of the ball until the knot hits. Repeat with the second end of the floss through the same hole. The knot will keep it from pulling though. Tie the two pieces together at the end to create a loop to hang the ball.
Wesołych Świąt!
© 2005 – 2013 Kathy Lewinski & Susan Cornish


4 Comments to Advent Calendar Project ’13 – Week 20