


(For the 24 weeks leading up to December 1st, we’ll be making a Christmas ornament. Each one will be traditional to or inspired by a different country)
This week we are headed to the Czech Republic for our ornament inspiration.
In the Czech Republic, St. Nicholas comes on December 6th climbing down to earth on a golden rope with at least one angel and devil. Children tell him whether they have been good or bad and receive a basket of small present similar to a stocking. The main celebrations are on Christmas Eve and this is when larger presents are given. Some people fast during Christmas Eve in the hope that they will see a vision of ‘the golden pig’ appear on the wall before dinner. This is meant to be a sign of good luck.
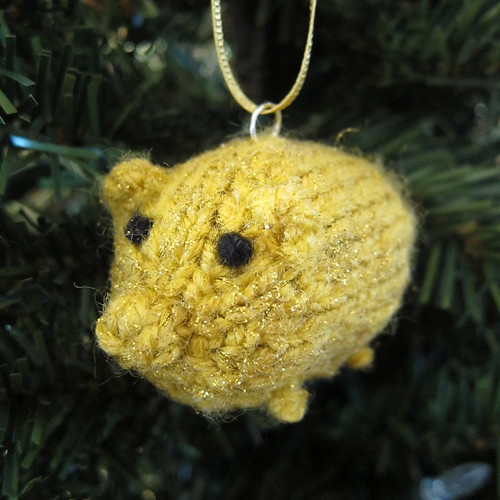
For our ornament, we’ve knit up a golden pig based on our Flying Pig pattern. Now you don’t need to fast to see the golden pig!
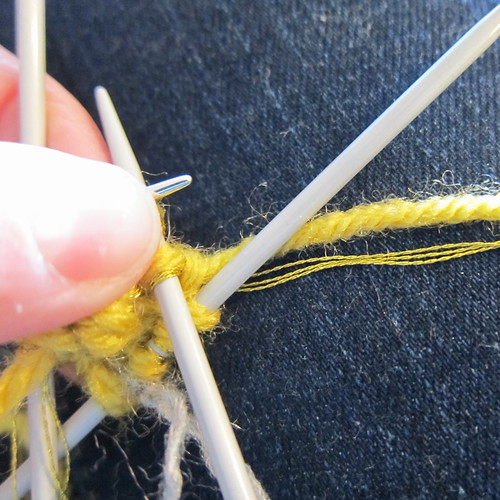
There are lots of different ways you can make your pig golden, use a yarn with gold in it, knit gold embroidery floss in with the yarn or add gold glitter to the finished pig. I did both of the last two. First I knit 3 strands of gold embroidery floss with the yarn.
It wasn’t as shiny as I wanted to I added some gold glitter paint to the top.
Knit Golden Pig
Download a PDF copy of the Knit Golden Pig Pattern
The size of your finished pig will depend on what weight yarn you use. My pig is about 2.5 inches long and made with worsted weight, but it is knit very tightly which can be a little tricky.
Supplies:
- four size 2 double pointed needles for the small or size needed to get a nice tight fabric with your yarn so the stuffing doesn’s show through
- gold yarn, this is a good stash buster as you use very little yarn
- gold embroidery floss (optional)
- scrap black yarn or embroidery thread for eyes on small pig
- gold glitter paint or glue (optional)
- jump ring
- ribbon
Tools:
- stitch marker
- scissors
- tapestry needle
- stuffing
Gauge: Isn’t super important for this pattern, you just want to make sure it is tight so the stuffing doesn’t show through.
Required Skills:
- knitting in the round on four needles (sometimes with few stitches)
- basic increases and decreases
- french knots
- picking up stitches
Abbreviations:
- k – knit
- p – purl
- kfb – knit into the front and back of the same stitch increasing one stitch
- ssk – slip two stitches as if to knit and then knit them together decreasing one stitch
- k2tog – knit two stitches together decreasing one stitch
Body:
Cast on 6 stitches. Place them evenly on 3 double pointed needles & join together without twisting. Put a stitch market between the first and last stitch to mark the row.
Row 1 & 2: knit
Row3: Knit into the front & back (kfb) of each stitch (12 stitches)
Row 4: knit
Row 5: *k1, kfb, repeat from * until end of row (18 stitches)
Row 6: knit
Row 7: *k2, kfb, repeat from * until end of row (24 stitches)
Row 8: knit
Row 9: *k3, kfb, repeat from * until end of row (30 stitches)
Row 10-19: knit
At this point embroider your eyes with the back yarn using French knots or attach your safety eyes. This is also a good time to pull your cast on tail inside through the middle of the snout.
Row 20: (k3, ssk)3x, (k3, k2tog)3x (24 stitches)
Row 21: knit
Row 22: (k2, ssk)3x, (k2, k2tog)3x (18 stitches)
Row 23: knit
At this point stuff your pig. Try to get him really full shaping as you go.
Row 24: (k1, ssk)3x, (k1, k2tog)3x (12 stitches)
Row 25: knit
Row 26: (ssk)3x, (k2tog)3x (6 stitches)
Cut off leaving a 6 inch tail. Weave the tail through the remaining stitches and pull tight. Tie a knit close to the body. The tail will be the pig’s tail. I twist it until curly & then cut it to the length I want for the small pig. For the larger pig I knit some corkscrew fringe.
Ears:
Pick up two stitches behind one of the eyes.
Row 1: knit
Row 2: p2tog
Cut yarn leaving a tail. Weave tail through the remaining stitch. Weave the tail through the side of the ear & then pull through the pig cutting off any excess yarn. Do the same with the tail from where you picked up the stitches.
Repeat for the second ear.
Feet:
For the feet I just knotted until I liked the size of the knot (for me that was three times) and then sewed the knot into place. I repeated this for all four legs.
Open a jump ring and insert it into the back of the pig. Close the jump ring. Tie ribbon through the jump ring into a loop to hang.
Veselé Vánoce!
Copyright 2013 Kathy Lewinski JustCraftyEnough.com
Do not duplicate for distribution, repost, sell or teach without permission
© 2005 – 2013 Kathy Lewinski & Susan Cornish
