

Here is a great quick knit project. You could knit them for yourself, or as a gift, and because they don’t take too much yarn, it could be done in something luxurious without breaking the bank. With the exception of a couple of u-turns, this is a really easy project.
![IMG_4388[10]](http://farm9.staticflickr.com/8544/8618208626_2629ab2aab.jpg)
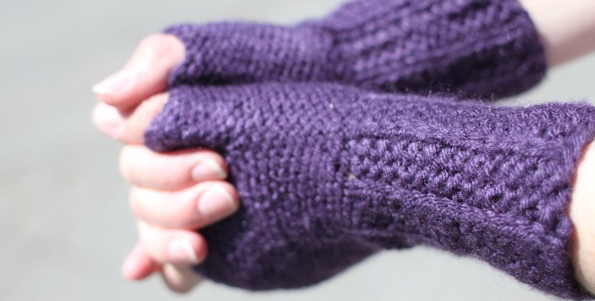
The ribbing used on these gloves is called Cartridge Belt Rib. It is normally done flat, but I have reworked the pattern to make it work in the round.
Cartridge Rib Fingerless Gloves
This pattern makes gloves that are about 7″ (17.79 cm) around.
Download the Cartridge Rib Fingerless Gloves Pattern
Abbreviations:
- k = knit
- p = purl
- yf = Yarn forward (without adding a wrap)
- yb = yarn back
- p2tog = purl 2 together
Gauge: 18 stitches over 4 inches on a size 7 needle
Required Skills:
- knitting and purling in the round on four needles
- wrap and turn
- picking up stitches
- basic decreases
Tools:
- four size 7 double pointed needles or size needed to get gauge
- 1 ball Aran weight yarn (Vanna’s Choice = 170 yards) (I have about 1/2 the ball left, I would estimate that 100 yds would be enough) (note: the gloves are knit to a tighter gauge than the ball band on the yarn recommends)
- stitch marker
- large safety pin, stitch holder or scrap yarn
- tapestry needle
Yarn: Aran weight – I used Vanna’s choice by Lion Brand in “purple”. I thought this was a good hearty choice, 100% acrylic and machine washable. I knit it on a smaller needle than the label. I wanted a tighter stronger fabric.
Special Techniques:
Wrap and Turn – If you have not done a wrap and turn, the Purl Bee has a great tutorial here. There are also a lot of great videos on You Tube.
Rib Pattern:
(done in the round)
Row 1: *K3, yf, slip 1 purlwise, yb*, K3
Row 2: P1 *yb, s1 purlwise, yf, P3* until last two before the marker then yb, s1 purlwise, yf, P1
A note about the rib pattern:
When you are on the “knit” row, the knit stitch predominate in the rib will be in the middle of the 3 knit stitches.
When you are in the “purl” row of the pattern, the “yarn behind” will be behind the prominent knit stitch of the rib.
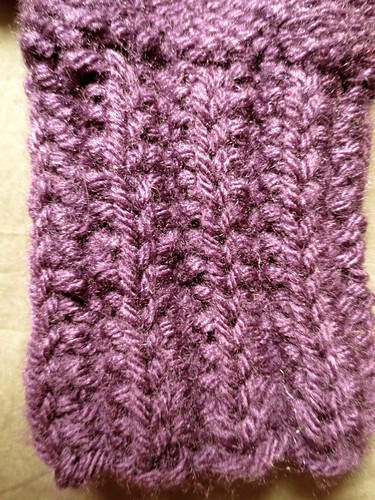
Here is a closeup of the rib pattern.
Pattern:
Cast on 31
Divide stitches across 3 needles. Join in the round being careful not to twist stitches.
Work around in row 1 of the rib pattern.
Add a stitch marker. To hold the marker on the needle, work the first stitch of row 2 on the end of that needle. The marker will be very helpful in keeping the rib pattern accurate.
Work 28 rows in the rib pattern. (Count 14 knit stitches in the prominent rib.)
Work to the marker. Wrap & turn. Knit round. (you are now going in the opposite direction. You are knitting on the “inside” of the glove and the purl is on the outside. You are now working counter clockwise around.)
Knit 10 rounds ending at the marker. Put 5 stitches (that you just worked) on a holder. (for this project, a big safety pin or scrap yarn will work.) Keep knitting. Work 26 stitches, then cast on 5 stitches over the 5 on the holder. (back to 31 stitches on the needles) Work another 14 rounds in purl. Cast off in purl.
![IMG_4392[8]](http://farm9.staticflickr.com/8385/8618208018_892730bd08.jpg)
Thumbs:
Take the 5 stitches off the holder. Pick up and purl two stitches up the short side, five stitches across the long side (to match the five stitches below it) and two more stitches on the short side. (14 stitches)
Divide between three needles. Place a stitch marker to mark rows and work in the round.
Purl 8 rows. Cast off in Purl.
Variation: If you have thin delicate thumbs, you could purl 5 stitches off the holder, p2tog, purl 5, p2tog in the first round. Then purl 7 more rows.
![IMG_4395[8]](http://farm9.staticflickr.com/8250/8618208234_5b0da48534.jpg)
Finishing:
Weave in ends. (there are 4 unattached yarns to weave in.) Use the yarn at the base of the thumb to close any small holes that were formed when picking up those stitches.
Here they are in their “pre blocked” state.
![IMG_4400[8]](http://farm9.staticflickr.com/8254/8617101061_cb841c76a2.jpg)
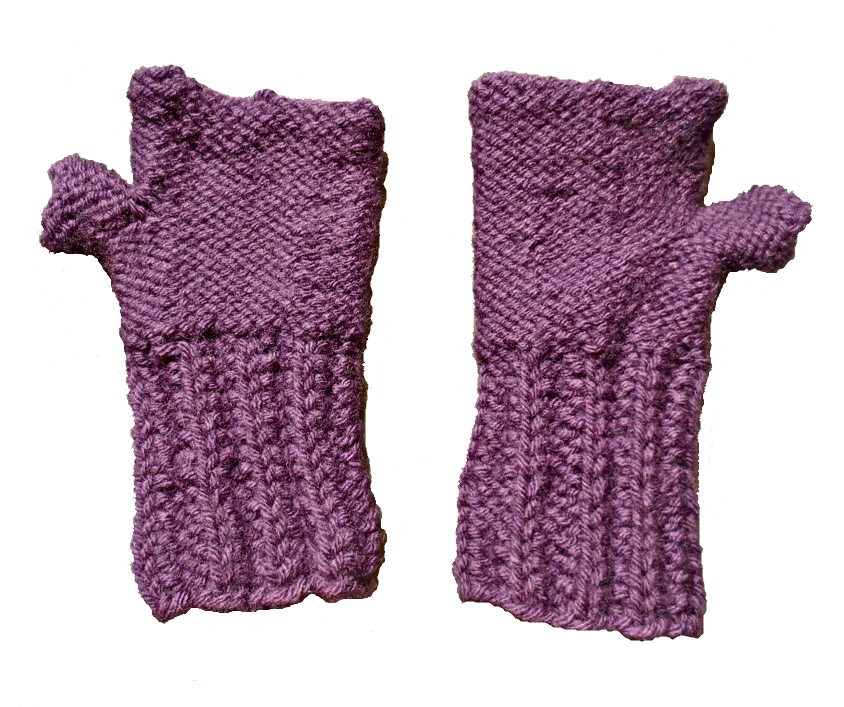
And in all their finished glory!
Photos of the finished gloves were taken by Meghan Wahl. (Thank you!)
Copyright 2013 Susan Cornish JustCraftyEnough.com
Do not duplicate for distribution, repost, sell or teach without permission.
© 2005 – 2013 Kathy Lewinski & Susan Cornish

Pingback: Ultimate guide to staying warm
Pingback: 50 DIY Scarves, Hats + Gloves to Keep You Warm | Henry Happened
Pingback: Knitting | Pearltrees
Pingback: Just Crafty Enough – Cartridge Rib Finger...
Pingback: Sewing | Pearltrees
Pingback: Cartridge Belt Rib Stitch: Instructions and Projects
Pingback: Always More Fingerless Glove Patterns – Knitting
Pingback: Learn The Cartridge Belt Rib With 7 Free Knitting Patterns