


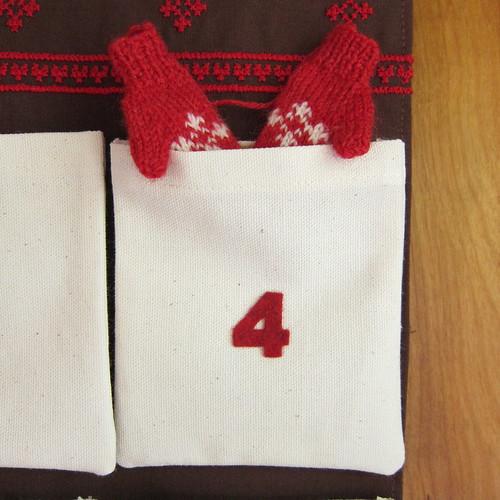
(Every week until December 1st we will be making a small Christmas ornament that can be used in our Pocket Advent Calendar. Join us in making all 24 or just pick and choose your favorites.)
This week’s ornament is for the knitters out there, a teeny, tiny pair of mini mittens.
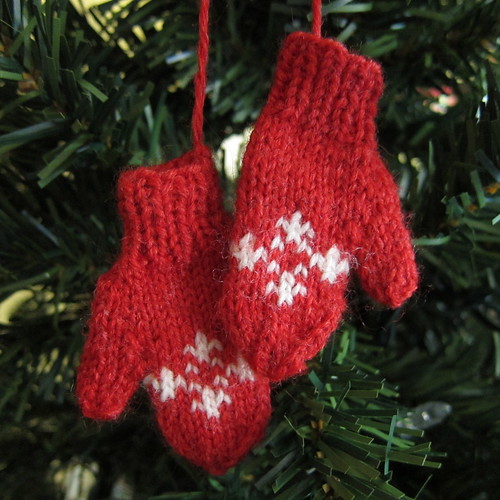
These little 2 1/2 inch mittens are perfect to hang on the tree, decorate packages or hang from that bottled hostess gift.

This is definitely a project for the intermediate knitter who is comfortable with working a small number of stitches on double-pointed needles. Adding in a colorwork snowflake chart takes it up another notch, but these would look cute with or without that addition. If you want some practice knitting small items on small double-pointed needles, why not try our Tiny Toques first.
Project: Mini Mittens
Download the Mini Mittens Pattern.

Supplies:
- small amount of sockweight yarn in red and white
- four size 2 double-pointed needles
- tapestry needle
Gauge:
- 9 stitches and 11 rows per inch (if your gauge is off slightly it won’t really matter since these don’t need to fit anyone)
Abbreviations: We recommend Knitting Help for great videos on how to do decreases, increases and cast ons.
- k = knit
- p = purl
- k2tog = knit two stitches together
- pm = place marker
- sm = slip marker
- m1l – make one stitch left
- m1r – make one stitch right

Cuff:
Cast on 18 stitches. On one of the mittens leave a long tail. Join in a circle being careful not to twist. Place a maker to mark the end of a round.
Work in k1p1 ribbing for ¾ inch
Hand:
Row 1: Change to stockinette, increase 1 stitch at the end of the row. (19 stitches)
Row 2: k9 stitches, pm, m1r, k1, m1l, pm, k9 (21 stitches)
Row 3: knit
Row 4: k9, sm, m1r, k3, m1l, sm, k9 (23 stitches)
Rows 5- 6: knit
Row 7: k9, sm, m1r, k5, m1l, sm, k9 (25 stitches)
Rows 8 – 9: knit (if you are doing the snowflake chart start it on row 9)
Row 10: k9, sm, m1r, k7, m1l, sm, k9 (27 stitches)
Rows 11-12: knit
Row 13: k9, put the nine stitches in between the markers on a scrap piece of yarn, cast on one stitch using the backwards loop cast on, k9
Row 14: k9, k2tog, k8
Work in stockinette until hand of mitten is about 1 ½ inches
Top of Hand:
Row 1: k7, k2tog, k7, k2tog (16 stitches)
Row 2: knit
Row 3: k2, k2tog, k2, k2tog, k2, k2tog, k2, k2tog (12 stitches)
Row 4: k1, k2tog, k1, k2tog, k1, k2tog, k1, k2tog (8 stitches)
Row 5: k2tog, k2tog, k2tog, k2tog (4 stitches)
Cut the yarn leaving a tail. Put the tail on the tapestry needle and weave through the stitches on the needle. Pull tight to close. Pull the yarn inside the mitten and weave in ends.
Thumb:
Put thumb stitches on 3 needles
Rows 1 – 3: k
Row 4: k1, k2tog, k1, k2tog, k1, k2tog (6 stitches)
Row 5: k2tog, k2tog, k2tog (3 stitches)
Cut the yarn leaving a tail. Put the tail on the tapestry needle and weave through the stitches on the needle. Pull tight to close. Pull the yarn inside the mitten and weave in ends.
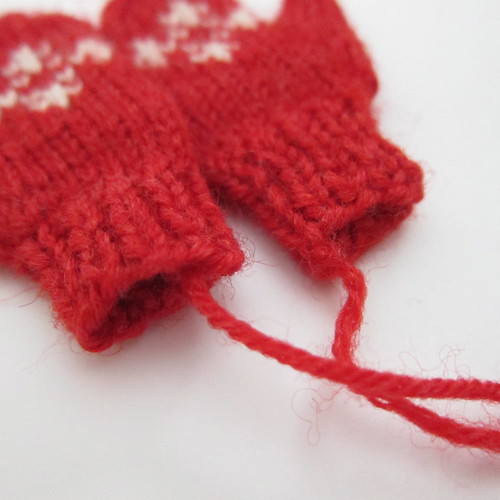
Weave in any remaining ends except the long one you left when casting on one of the mittens. Block if desired (I found this really helped with the shape). Use the remaining tail to join the mittens together.
Copyright 2012 Kathy Lewinski
JustCrafyEnough.com
This pattern is for personal use only. Please do not sell, distribute or teach this pattern without my permission. Do not claim this pattern as your own. Do not sell items made with this pattern without permission.
© 2005 – 2012 Kathy Lewinski & Susan Cornish

Pingback: Free Knitting Patterns: Ornaments for an Advent Calendar · Knitting | CraftGossip.com
Pingback: The Advent Calendar Project Week 22 Felt Owls · Felting | CraftGossip.com
Pingback: 33 Adorable And Creative DIY Ornaments - Zeusitup.com
Pingback: 25 DIY Christmas Ornament Ideas | DeMilked
Pingback: 20 Creative DIY Christmas Ornament Ideas | Bored Panda
Pingback: 20 Creative DIY Christmas Ornament Ideas | orange elephant
Pingback: 2013 legjobb "csináld magad" karácsonyi dísz ötletek - Ha Érdekel
Pingback: Los mejores ideas para adornos de Navidad - Si Te Interesa
Pingback: 20 Creative DIY Christmas Ornament Ideas | a-designer
Pingback: DIY ozdoby świąteczne | nieco inny
Pingback: 20 Creative DIY Christmas Ornament Ideas | DIY Home Decor
Pingback: Top 10 DIY Christmas Ornaments - Top Inspired
Pingback: 45 DIY Creative And Easy Christmas Tree Ornaments
Pingback: 20 Simple Yet Cute Handmade Christmas Ornaments 2013
Pingback: Christmas Knitting Project Roundup Part 1 | Dainty Loops
Pingback: 33 Creative And Adorable DIY Ornaments You Gotta Check Out
Pingback: 25 Ideas para adornar esta navidad
Pingback: 41 Adorable Christmas Decorations You Can Make This Holiday Season | ScoopNova
Pingback: 45 DIY Creative And Easy Christmas Tree Ornaments - DIY Crafts Home
Pingback: 33 Adorable And Creative DIY Ornaments - encun
Pingback: 20 Creative DIY Christmas Ornament Ideas | Viral Content | We Bring The Best Content On The Web
Pingback: 41 DIY Christmas Ornaments to Make Your Tree One-of-a-Kind
Pingback: Ideas para decorar en Navidad hechas con tus manos
Pingback: Ideas para decorar en Navidad tu hogar, hechas con tus manos - Decoracion.red
Pingback: 20 Things To Make Now For Christmas - 365 Days of Crafts365 Days of Crafts
Pingback: 35 DIY Christmas Ornaments: From Easy To Intricate!
Pingback: 25 DIY Ornaments For Christmas
Pingback: 35 DIY Christmas Ornaments: From Easy To Intricate!
Pingback: Awesome DIY Christmas Ornaments: From Easy To Intricate!
Pingback: TRENDING — 20 Creative DIY Christmas Ornament Ideas | OU DIY 2
Pingback: 17 Easy To Make Homemade Christmas Decorations
Pingback: DIY Christmas Ornaments
Pingback: 7 Handmade Xmas Tree Ornaments | Living Green and Healthy in Dallas
Pingback: 18 Creative DIY Christmas Ornament Ideas - GraphicLoads
Pingback: 21 Amazing simple penguin ornaments | Amazing to know on earth
Pingback: Amazing distinct do it yourself christmas ornaments
Pingback: Extremely genuine homemade christmas tree decorations – ViralSiam
Pingback: Extremely fantastic easy christmas crafts for adults | Most Viral
Pingback: Best wonderful DIY Christmas ornament ideas – BluesWhite
Pingback: Quite incredible lightbulb ornaments | Amazing
Pingback: Really great christmas decoration ideas | RADOWORLD
Pingback: Very one-of-a-kind home made christmas ornaments | Giant Straw Dragon
Pingback: Amazing stunning ornament Christmas DIY | Welcome to Look-is-Learn!
Pingback: 🎄 20 DIY δημιουργικές ιδέες για να φτιάξετε Χριστουγεννιάτικα στολίδια! 🎄 - www.kallitexnikesdimiourgies.gr
Pingback: Extremely wonderful personal Christmas ornaments | amazingnatureallife
Pingback: 21 Extremely cute diy Christmas tree ornaments |
Pingback: Extremely remarkable easy christmas ornaments | Boredzebra
Pingback: Highly lovely outdoor christmas ball ornaments - NICE PLACE TO VISIT
Pingback: Really wonderful funny christmas ornaments | Welcome to Oukong Stick
Pingback: 20 LUDILO ideja za Božićne ukrase koje možete izraditi sami – Svi će biti oduševljeni! - MyAlea
Pingback: Extremely Lovely Easy DIY Christmas Ornaments | topholidaytour.com
Pingback: Very lovely cork christmas ornaments | Topper Idea
Pingback: Really great easy christmas decorations
Pingback: 20 Extremely awesome primitive craft ideas | Theblueb
Pingback: Very Gool Creative DIY Ornaments | Mobile Popz!
Pingback: Extremely genuine homemade christmas tree decorations – Dailyza
Pingback: Defying Tradition: 13 Non-Traditional DIY Christmas Ornaments - DIY CHICKS
Pingback: 53 Handmade Ornaments YOU Can Make - Happily Ever After, Etc.
Pingback: 30 Creative and Easy DIY Christmas Ornaments/ Homemade – The Lifestyle Hacks | Food Recipes, Fitness, & DIY
Pingback: 30 Creative and Easy DIY Christmas Ornaments – DIY Ideas
Pingback: 20 Creative DIY Christmas Ornament Ideas – DittoBop
Pingback: 65 DIY Christmas decorations that take your decor to the next level
Pingback: 35 DIY Christmas Ornaments: From Easy To Intricate! - Diyideas
Pingback: 65 decorações de Natal caseiras
Pingback: 81 Christmas crafts to make and sell
Pingback: Simple do-it-yourself Christmas decorations that will brighten your entire home
Pingback: 81 Christmas Crafts to Make and Sell - Bestoka Best DIY Projects
Pingback: Homemade Christmas Crafts to Sell on a Budget – MykList
Pingback: ≫ Adornos para un Calendario de Adviento – Tejer
Pingback: 20 Seasonal Crochet Patterns to Make this Christmas - Dabbles & Babbles
Pingback: Unconventional Christmas Ornaments: 13 Creative DIY Decorations To Try
Pingback: Adornos navideños poco convencionales: 13 decoraciones creativas de bricolaje para probar - Bienvenidos a mi sitio web...
Pingback: 30 Handmade Christmas Ornaments For A Stylish Holiday Tree
Pingback: 80 Cute Homemade Christmas Tree Ornaments to Make