

Oh man, did I ever love the look of the Missoni for Target line that came out this fall. I was in Alaska at the time it came out and nowhere near a Target which means I didn’t get to go pick up any. (My lovely cousin Jenny did pick me up a notebook though!) I love the colors and the zig-zag look, so I decided it would be easy to create my own knit items with a similar look.

A series of increases and decreases are used to create the zig-zag look of the cuff easily. There are a lot of different ways to do this pattern out on the internet, but I wasn’t happy with any of them. They either left holes at the increases or didn’t give a sharp enough point. So, I played around with different decreases and increases until I found the pattern below which worked beautifully.The pattern is tighter than knitting the same amount of stitches in stockinette, so it creates a nice snug cuff.
I chose Vickie Howell’s Sheep(ish) yarn to do these mittens in because it came in the perfect bright colors and is readily available at big craft stores like Joann’s. It is a roving yarn, so quite fuzzy with very little twist. Sometimes that lack of twist makes it a little harder to work with, but it is so soft and billowy. (Crazily, after I started these mittens Vickie created a Missoni-style pattern for vase cozies for Craft using the same yarn in different colors.)
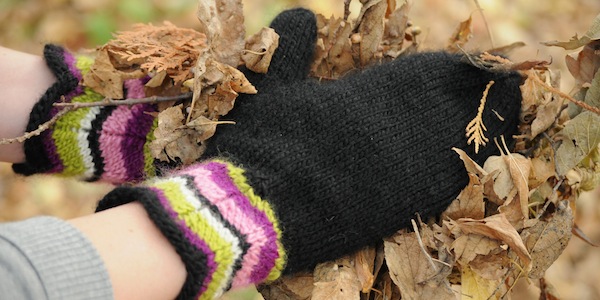
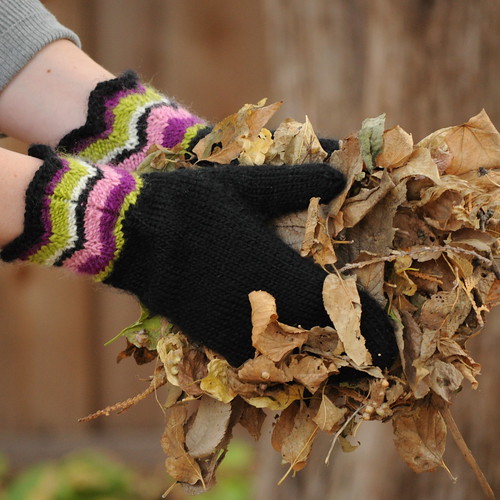
Those Zig-Zag Mittens
This pattern makes mittens that are about 8″ around the hand. If you need a bigger mittens use bigger needles for a looser gauge, if you need smaller mittens use smaller needles for a tighter gauge. You determine the length of the hand and thumb as you are knitting.
Supplies:
Yarn:
- 1 ball Vickie Howell Sheep(ish) in Black(ish)
- 15 yards Sheep(ish) in Magenta(ish)
- 10 yards Sheep(ish) in Pink(ish)
- 5 yards Sheep(ish) in White(ish)
- 15 yards Sheep(ish) in Chartreuse(ish)
Needles: Four size 6 double pointed needles (or size needed to get gauge).
Tapestry needle
2 stitch markers
Gauge:
5 1/2 stitches per inch in stockinette
Abbreviations:
M1R – Make 1 Right
M1L – Make 1 Left
K2tog – knit 2 together
Ssk – slip, slip, knit
K – knit
Sm – slip marker
(I recommend KnittingHelp.com if you need help with any of the above techniques)
Cast on:
Cast on 44 stitches. Divide between three needles (15, 15, 14). Join together to knit in the round, being careful not to twist the stitches. Place a stitch marker between the last and first stitch.
Cuff:
In Black(ish)
Row 1: Purl
Row 2: *(k2tog, k3, M1L, k1, M1R, k3, ssk), repeat from * 3 more times
Row 3: k
Switch to Mangenta(ish)
Row 4: *(k2tog, k3, M1L, k1, M1R, k3, ssk), repeat from * 3 more times
Row 5: k
Switch to Chartreuse(ish)
Row 6: *(k2tog, k3, M1L, k1, M1R, k3, ssk), repeat from * 3 more times
Row 7: k
Row 8: *(k2tog, k3, M1L, k1, M1R, k3, ssk), repeat from * 3 more times
Row 9: k
Switch to White(ish)
Row 10: *(k2tog, k3, M1L, k1, M1R, k3, ssk), repeat from * 3 more times
Row 11: k
Switch to Black(ish)
Row 12: *(k2tog, k3, M1L, k1, M1R, k3, ssk), repeat from * 3 more times
Row 13: k
Switch to Pink(ish)
Row 14: *(k2tog, k3, M1L, k1, M1R, k3, ssk), repeat from * 3 more times
Row 15: k
Row 16: *(k2tog, k3, M1L, k1, M1R, k3, ssk), repeat from * 3 more times
Row 17: k
Switch to Magenta(ish)
Row 18: *(k2tog, k3, M1L, k1, M1R, k3, ssk), repeat from * 3 more times
Row 19: k
Row 20: *(k2tog, k3, M1L, k1, M1R, k3, ssk), repeat from * 3 more times
Row 21: k
Switch to Chartreuse(ish)
Row 22: *(k2tog, k3, M1L, k1, M1R, k3, ssk), repeat from * 3 more times
Row 23: k
Switch to Black(ish)
Row 24: *(k2tog, k3, M1L, k1, M1R, k3, ssk), repeat from * 3 more times
Row 25: k
Row 26: *(k2tog, k3, M1L, k1, M1R, k3, ssk), repeat from * 3 more times
Row 27: k
Hand:
Row 1: M1R, k1, M1L, place marker, knit until end of round
Row 2 – 3: Knit
Row 4: M1R, k3, M1L, sm, knit until end of round
Row 5 – 6: Knit
Row 7: M1R, k5, M1L, sm, knit until end of round
Row 8 – 9: Knit
Row 10: M1R, k7, M1L, sm, knit until end of round
Row 11 – 12: knit
Row 13: M1R, k9, M1L, sm, knit until end of round
Row 14 – 15: knit
Row 16: M1R, k11, M1L, sm, knit until end of round
Row 17 – 18: knit
Row 19: M1R, k13, M1L, sm, knit until end of round
Row 20 – 22: knit
Row 23: M1R, k15, M1L, sm, knit until end of round (17 stitches between the markers, the marker you place in row 1 and your end of round marker)
Row 24: Knit
Row 25: Place the 17 stitches between the markers on a stitch holder or piece of scrap yarn. (These stitches will become the thumb) Cast on one stitch using the backwards loop method. Knit until end of round.
Row 26: K2tog, knit until end of the round (43 stitches)
Knit every round until the hand length reaches the top of your little finger.
Hand Decreases:
Row 1: k9, k2tog, k9, k2tog, k9, k2tog, k10 (40 stitches)
Row 2: knit
Row 3: k8, k2tog, k8, k2tog, k8, k2tog, k8, k2tog (36 stitches)
Row 4: knit
Row 5: k7, k2tog, k7, k2tog, k7, k2tog, k7, k2tog (32 stitches)
Row 6: knit
Row 7: k6, k2tog, k6, k2tog, k6, k2tog, k6, k2tog (28 stitches)
Row 8: knit
Row 9: k5, k2tog, k5, k2tog, k5, k2tog, k5, k2tog (24 Stitches)
Row 10: knit
Row 11: k4, k2tog, k4, k2tog, k4, k2tog, k4, k2tog (20 stitches)
Row 12: knit
Row 13: k3, k2tog, k3, k2tog, k3, k2tog, k3, k2tog (16 stitches)
Row 14: knit
Row 15: k2, k2tog, k2, k2tog, k2, k2tog, k2, k2tog (12 stitches)
Row 16: k1, k2tog, k1, k2tog, k1, k2tog, k1, k2tog (8 stitches)
Cut off yarn leaving about a 6-inch tail. Put yarn on a tapestry needle and weave through the remaining stitches. Pull to the inside of the mitten and weave in.
Thumb:
The 17 stitches on the holder will make your thumb. There will be a tiny hole where the thumb meets the mitten, so we will pick up 2 stitches to close the hole up.
Put the 17 stitches you put on a stitch holder earlier on three double-pointed needles.
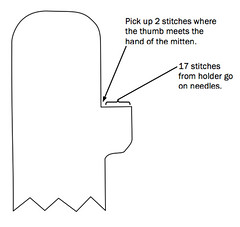
Using your main color yarn, pick up and knit two stitches from the body of mitten, placing a stitch marker between them. The stitch marker will mark the end of a round. You will knit the thumb in the round.
Row 1: knit
Row 2: k2tog, k15, k2tog (17 stitches)
Row 3: k8, k2tog, k7 (16 stitches)
Knit every row until the thumb is almost to the tip of your thumb, mine was about 2 inches.
Dec Row: k2tog until end of round (8 stitches)
Knit one row
Dec Row: k2tog until end of round (4 stitches)
Cut off yarn leaving about a 6-inch tail. Put yarn on a tapestry needle and weave through the remaining stitches. Pull to the inside of the thumb and weave in.
Weave in all ends.
If you find any mistakes in this pattern please let me know so they can be corrected.
copyright 2011 Kathy Lewinski
www.justcraftyenough.com
Do not sell or duplicate this pattern. Do not sell items made with this pattern. Do not teach this pattern without my permission. Thank you.
© 2005 – 2011 Kathy Lewinski & Susan Cornish

Pingback: How-To: Zig-Zag Mittens @Craftzine.com blog
Pingback: Pattern Picks: Zig-Zag Mittens « knitnook
Pingback: Stumbling Over Chaos :: In which it is Friday and there is linkity and no one is surprised at all
Pingback: Zig Zag Mittens – Free Pattern · Knitting | CraftGossip.com
Pingback: Link Love: Free Knitting Patterns | FaveCraftsBlog
Pingback: Target Zig-Zag Mittens | Copycat Crafts
Pingback: Knitting Recipe Remixes: Shetland Pony Drink Cozy + Handbook Fingerless Chevron Mitts | knitbyahenshop
Pingback: Zig Zag Mittens – Free Pattern – Knitting