
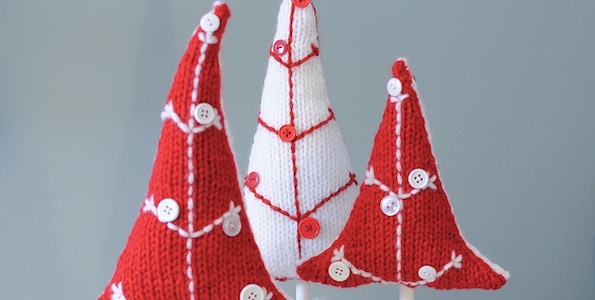

Last week as part of the UFO challenge for Iron Craft, I finished one of these potted button trees that I had been sitting for almost a year. I promised I would share the pattern with all of you this week and here it is.

These were so quick to make up that I made two more in a medium and small size on top of the one I had made last week.
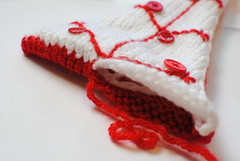
Color-wise, I stuck to the colors of my inspiration trees from a Christmas store in Bruges, Belgium, but I think they could be done in so many ways. The ones I made are red on one side and white on the other, which goes well with the Scandinavian way I tend to decorate for the holidays. But I could also see them done in more natural colors with green trees and the original terra cotta colored pot. Or you could take them a glam route and knit black and white trees with sparkly buttons and paint your pots silver. The variations could fit any style.
Potted Button Trees
Approximate tree sizes including pot (if you knit them to gauge)
Large – 15” Medium – 14” Small – 12”
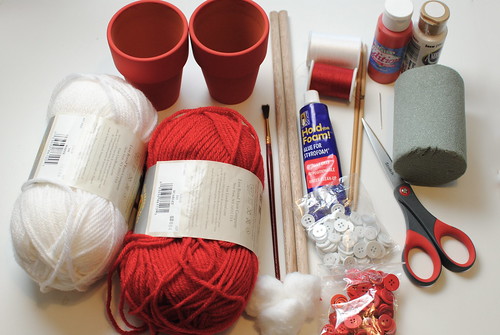
Supplies:
2/3″ diameter dowels – cut to 12″, 11″ and 9″ lengths
three 2 1/2″ terra cotta pots
red and white acrylic paint
paintbrush
red and white medium weight yarn (Afghan, Aran, or Worsted)
size 7 knitting needles or size needed to get gauge
tapestry needle
red and white buttons
red and white thread
sewing needle
stuffing – I use polyfil
florist foam to fit in pots
serrated knife
foam glue
cotton balls
Paint:
Paint the dowels white and the pots red. You don’t need to worry about painting the whole dowel, just what will show. Let dry while you make the trees.
Knit the Trees:
Lion’s Brand Vanna’s Choice or similar medium weight yarn (you won’t use a whole ball)
Gauge – 4.5 stitches per inch (gauge isn’t super important here but smaller gauge=smaller tree and vice versa.)
Needles – Size 7 or size to get gauge.
ssk = slip, slip, knit
k2tog – knit 2 together
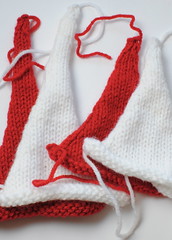
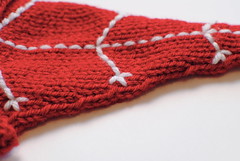
Knit two triangles of the same size for each tree. My trees are red on one side and white on the other.
Large Tree
Cast on 30 stitches
Row 1 – purl
Row 2 – k1, ssk, k until last 3 stitches, k2tog, k1. 28 stitches remain.
Working in stockinette, decrease in this manner every 4th row 7 more times. 14 stitches remain.
Then decrease in this manner every 6th row 5 times. 4 stitches remain.
Work 3 more row in stockinette.
Last row k1, k2tog, k1
Bind off.
Medium Tree
Cast on 28 stitches
Row 1 – purl
Row 2 – k1, ssk, k until last 3 stitches, k2tog, k1. 26 stitches remain.
Working in stockinette, decrease in this manner every 2nd row 3 more times. 20 stitches remain
Then decrease in this manner every 4th row 4 times. 12 stitches remain
Then decrease in this manner every 6th row 4 times. 4 stitches remain.
Purl one row.
Last row – k1, k2tog, k1
Bind off.
Small Tree
Cast on 26 stitches
Row 1 – purl
Row 2 – k1, ssk, k until last 3 stitches, k2tog, k1. 24 stitches remain
Working in stockinette, decrease in this manner every 2nd row 4 more times. 16 stitches remain.
Then decrease in this manner every 4th row 6 times. 4 stitches remain.
Purl a row
Last row – k1, k2tog, k1
Bind off.
Weave in all your ends.
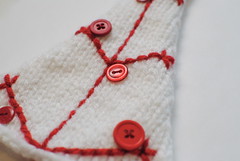
Using red thread on the white triangle and white on the red triangle, backstitch on the branches and trunk. The vertical stitches are two knit stitches tall, the diagonal stitches are one knit stitch wide. I like to do the two bottom branches first, then the center trunk and top two branches. From there you can evenly space out the branches in-between. Make sure the branches end before the last two stitches on the sides of the triangle.
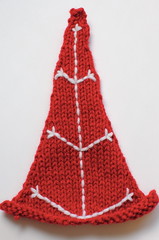
Using co-ordinating thread sew buttons on the trees.
Sew the trees together using either color yarn. Start by using mattress stitch up on side and down the other. Then horizontally seam just about halfway across the middle.
Start lightly stuffing the tree, you don’t want to over stuff these. You want them to stand up, but not be round. Stuff the top fully about 1 1/2″ down and the side where the bottom is closed. Gently put your dowel in (with your top stuffed the dowel should only go in about 1 1/2″ from the top of the tree) and stuff the open side. Pull the yarn around the dowel on the side of the tree that is the same color as the yarn you are using to sew.

Finish horizontally seaming the bottom. Weave in the end.
Put the Potted Tree Together:
Using your serrated knife trim the florist foam to fit in the pot. It doesn’t have to fill the whole thing. Make sure the foam sits about 1/4 inch below the top of the pot.
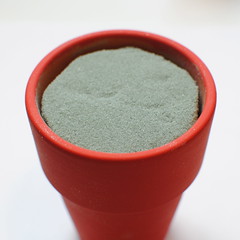
You can glue it in with the foam glue, but it should be snug enough that you don’t need to.
Stick the dowel in the center of the foam as straight as you possibly can. This will take a little bit of force. Once again you can use a little foam glue if you want. Put some foam glue on top of the foam in the pot and cover with shredded cotton ball to look like snow.
If you knit up a set of these we’d love to see them! Add your picture to our Flickr group.
copyright 2011 Kathy Lewinski
www.justcraftyenough.com
Do not sell or duplicate this pattern. Do not sell items made with this pattern. Do not teach this pattern without my permission. Thank you.
© 2005 – 2011 Kathy Lewinski & Susan Cornish

Pingback: How-To: Knit Potted Button Trees @Craftzine.com blog
Pingback: ispirazioni di luglio e agosto 2011 | elemento di disturbo
Pingback: Belles idées de Noël «
Pingback: The Xmas knit list | Wool Rocks
Pingback: Navidades 2012 III « La Maison Bisoux
Pingback: Inspiration. Christmas decoration – knitted Christmas trees « Craft Bay
Pingback: Petits accessoires | Pearltrees
Pingback: Inspiration. DIY Christmas decorations | my Craft Bay
Pingback: CRAFTS | Pearltrees
Pingback: Strikket julepynt
Pingback: Inspiration. DIY Christmas decorations my Craft Bay
Pingback: ein Tannenbaum … | Fusselideen
Pingback: A Very Late Christmas Post | theresacouch
Pingback: TEXTILES & CRAFTS | Pearltrees
Pingback: Decorazioni Natalizie… | VioletaB
Pingback: Episode 124: Only Everything is Enjoyable | Imagined Landscapes
Pingback: 27 Christmas Tree Knitting Patterns - Knitting News
Pingback: Festive Knit Christmas Tree Pattern ( SitnCrochet 2023