

I’ve been batting around a couple idea for colorwork designs for mittens. As I sat down today to draw them up, I thought perhaps some of you might be interested in knowing how to do this too. So, here’s my step by step guide.
1. Figure out the gauge you will be knitting in. – The best way to do this it so knit a swatch with the yarn and needles you will be using. You will need to know the amount of stitches and rows per inch. (Read Susi’s post on gauge here.) My gauge will be 9 stitches and 11 rows per inch. I know some of you are groaning about that gauge, but a small gauge like that gives you more stitches to create more detailed designs.
2. Create some graph paper in your gauge. – On normal graph paper the boxes are the same height and width. This does not work for designing a knitting pattern. Typically, you have more rows per inch than stitches, so if you designed a pattern using regular graph paper your image may come out a little more squished than you had planned once you knit it up.
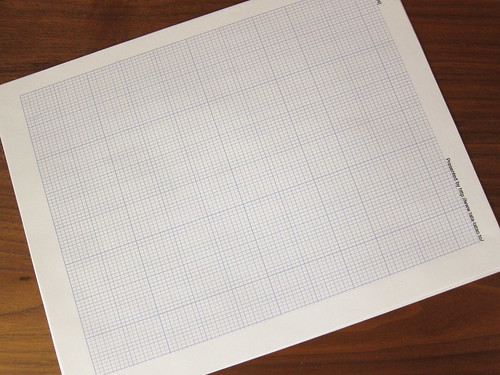
Luckily, there are free online sites where you can make knitters graph paper. I used this one at the ABCs of Knitting, but there are quite a few different sources. Follow the instructions to get make the graph paper in your gauge and print out a sheet or two. (Here’s a little trick, I want to be able to put both the front & back of my mitten on one sheet of paper which means it needs to be landscaped. In order to make my grid go the right direction I put the stitches number in for rows and the rows number in for stitches.)
3. Sketch out the outline of the hand of your mitten – Here you will need to know the basic pattern for your mitten. How many stitches you are casting on, how long you are knitting it and how the decreases are done for the top. (If you are looking for some good basic knitting patterns in any gauge I highly recommend Ann Budd’s The Knitter’s Handy Book Of Patterns.) Now draw in the outline of your mitten. I like to do this in pen so it won’t accidentally be erased later on.
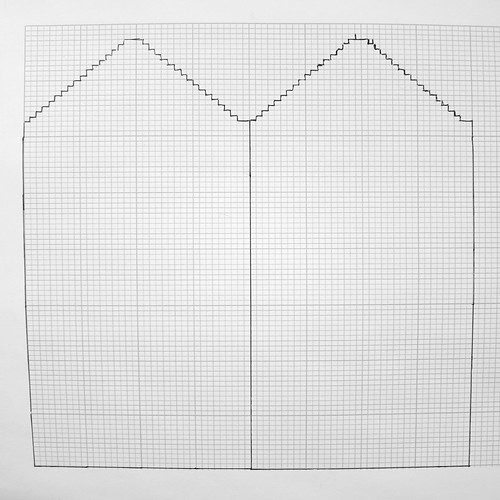
If your pattern doesn’t tell you how many rows to knit it’s actually pretty easy to figure out. My mittens needed to be 6 1/4 inches before the decrease (this is the measurement from the bottom of my hand to the tip of my little finger). I know my gauge is 11 row per inch, so I multiply 11 x 6.25 which gives me 68.75. I round up and know that my mitten need to be 69 rows before the decreases, that’s 69 blocks on my graph.
4. Use a pencil to start drawing in your pattern. – This is the fun part where you start designing your pattern. Just shade in each square you want to be a different color. Use a pencil so you can erase and play with the design. If you plan on doing multiple colors use colored pencils. You can pretty much design right up to the sides, but I recommend leaving a blank stitch or two around the decreases. It’s a personal choice, but I just think it looks nicer.

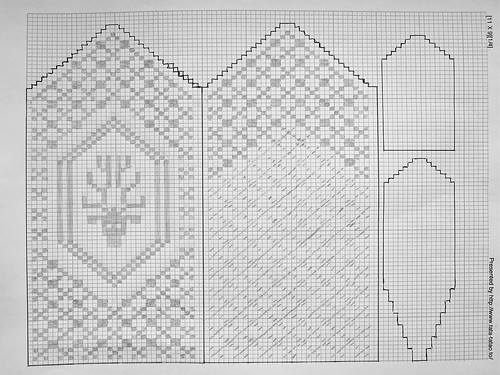
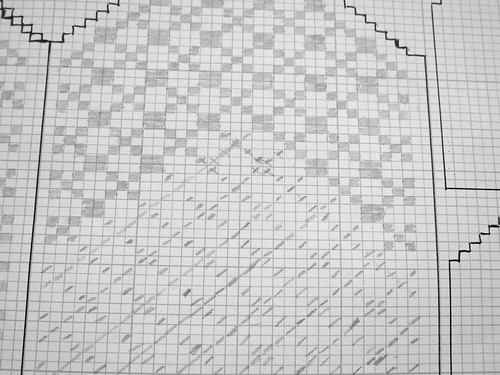
Pigs and hearts are very common Swedish design elements and I used both of them in this design. For a little something extra I made my pig a flying pig. I started by drawing in the pig and then built the background around it. I sketched in the shape I wanted and then start filling in squares to fill in the shape. I do a lot of erasing and moving things around before I’m happy with the final design. This pattern has an insert thumb so I needed to design for it too.
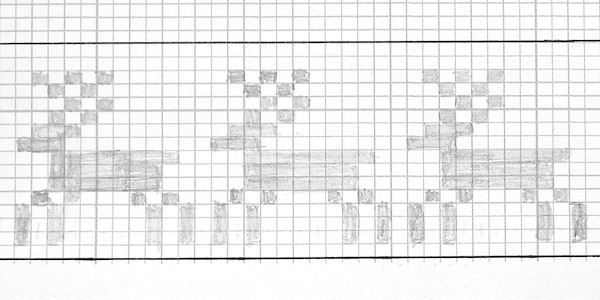
My second idea features a deer head on the center of the front with a pretty basic pattern as the background for the rest of the mitten. This one was a lot easier to design, though I did have to move the deer head section three times in order to get it centered in the background the way I liked. I haven’t figured out what to do on the thumb yet perhaps another deer head.
It can get a little tedious filling in all those squares, especially on an all over pattern like this. The other option is to just put a dot or dash in the squares. It goes quicker, but I find it hard to visualize the whole pattern this way.
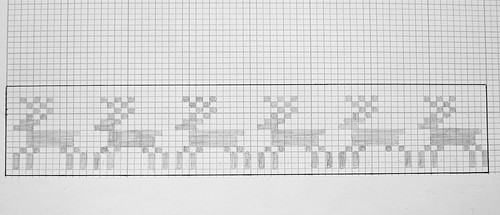
I decided to add a design section to the cuff of this mitten too. I was just lucky the little deer went around the cuff an even number of times.
Now I need to figure out which one I want to knit up first! Which do you like best?
Have you ever created your own colorwork design? We’d love to hear your tips and experiences.
(I found the designs for the pig (though I added the wing) and the deer in the wonderful book 55 Christmas Balls to Knit)

This so cool, I want to try!
I love that flying pig!!! I really need to learn how to knit. lol
I really like the cuff with the deer.
Wow, so much work goes into designing a pattern, I’m impressed! I love the flying pig!
Pingback: Friday Finds « Threadpanda
Hi Kat,
you might want to have a play with our new iPhone app called KnitCraft. It lets you experiment with colors and shapes so you can design your own patterns and see what they will look like. Check it out!
http://itunes.apple.com/us/app/knitcraft/id492693248?mt=8
I really love the flying pig, and may have to add that to the knitting I want to get done this year. I have a ton of graph paper, but I usually use it for designing quilts rather than knitting.
Love them! I saw flying pig first =)
Um, that should say “I say flying pig first” now “I saw” . . .
Pingback: My Root Pearl | Pearltrees
How do you measure for the thumb? I want to try this out so I can design my own color-work pattern. I am hoping your can give me an idea on how to design the thumb part for the chart. I hope you understand what I am trying to ask…
Do you mean the length of the thumb or the width?
Well I think both. But…Sorry I am having a hard time putting this into words. So I am assuming the width like how do you know how much stitches are for thumb and when to decrease. Like how did you figure out the thumb to fit you. Sorry if I am not making sense.
I’m driving home from vacation over the next couple of days but when I get back I’ll send you an email & see if I can help.
Thank you! Be careful cause some people are sometimes a bit scary driving. Like one time I was driving home after some appointment and the driver in front was a bit jerky, moving from side to side like he/she was reaching for something and driving at the same time, it was a bit unnerving to see in front of me until I decided to pass the car since it was three lane road. Be careful and safe Kat and hope to hear from you soon. =)