
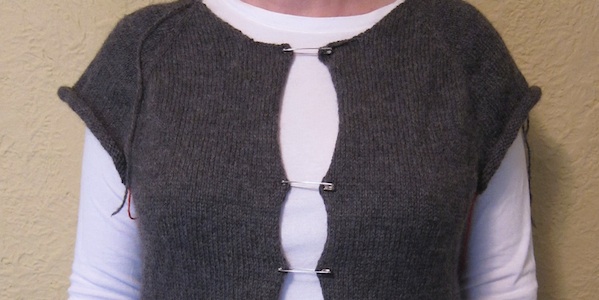

Woohoo! I am through the biggest stockinette section of the hoodie. And it fits!
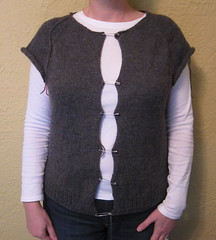
(The safety pins give you the idea of how it will fit closed with a 1″ button band)
This is probably the easiest section of this sweater, but one where you have a lot of possibilities to change the fit. After the armholes there are gentle decreases for waist shaping follow by slightly sharper increases for your hips. Then once you have reached the correct length you add 2 inches of knit 2 purl 1 ribbing.
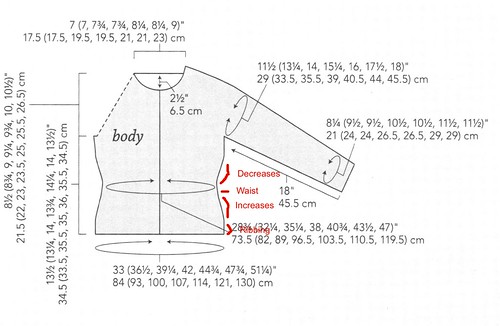
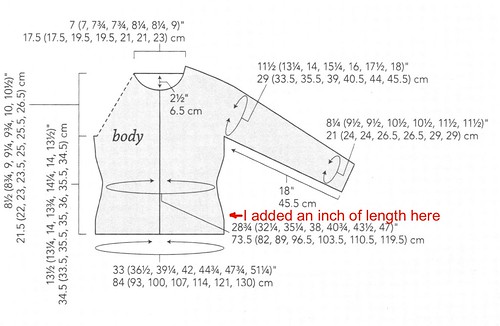
So, let’s talk about what changes you can make in this section. The easiest one of course, is the length of the sweater. Since you can try this sweater on as you are making it, you can decide how long you want it. The pattern in my size called for the body to be 11 3/4 inches long from the armhole. I’m tall and found that to be just a little shorter than I wanted, so I added an extra inch before the ribbing.
In reverse, if you are short make the section before the ribbing a little shorter. When I finished the decrease and increase section of my sweater it was exactly the length the pattern called for. If I wasn’t adding an inch of length I would have moved right on to the ribbing. So if you do decide to shorten the sweater, you may want to just lose an equal number of decrease and increase repeats instead of just stopping the knitting early. Otherwise you’ll have all the decrease repeats, but not enough length to do an equal amount of increases.
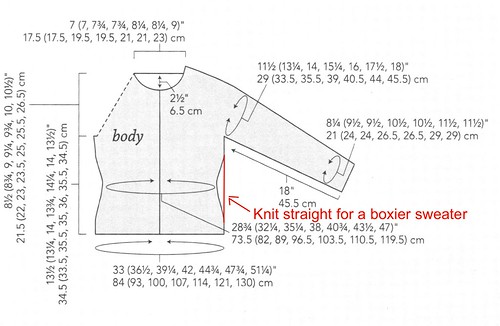
You can also play with the decreases and increases. This sweater doesn’t have dramatic waist shaping, it only goes in about an inch. You could leave the shaping out all together for a boxier jacket look, if you wished. On the other hand, you could also make it have a more shaping by adding more decreases. This would mean you would have to do them closer together than the pattern calls for so as not to add length to the sweater. You would also have to add the same amount increases later on (unless you have no hips).
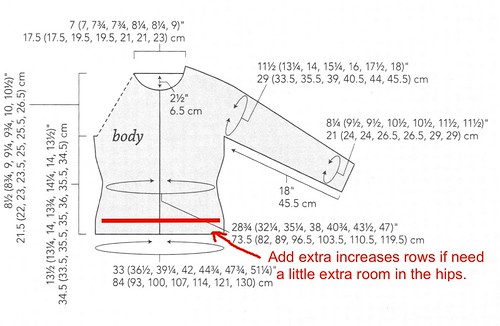
If you are like me and need things a little bigger around the hips, this can easily be fixed by adding a few more increases at the end. I actually thought I might have to do this, especially since I ended up making the sweater a little longer. In the end there was enough ease in the sweater to make it a comfortable fit.
One more variation for those of you who are busty, or tending to the apple shape: Pick a pattern size that will fit in the bust, and begin that size as it is printed. Start the decreases, and depending on how busty you are, you can do them as stated, or faster. This will form the waist taper. If you do not have hips, or an hour glass figure, then you could actually just continue with the length, and not do the increases. The sweater will go straight down. Depending on your figure, this will look like a tailored jacket. The risk with doing the increases at the bottom will be that they look like a mini peplum, and that is not the ‘vibe’ of this hoodie.
You could also change where the waist hits if you are short or long waisted. This would take some careful measurements of yourself and the sweater. It is something that really makes more of a difference in a more body conscious sweater than this one.
Next it’s on to the sleeves and the first colorwork section of the sweater.
© 2005 – 2011 Kathy Lewinski & Susan Cornish
