


This week Susi challenged us to use our Midas Touch & make something utilizing gold (it didn’t have to be real gold, or course, have you seen the price of that stuff?!). I had to think a lot about this one as I tend not to wear yellow gold or use it in decorating around my house. We were given the option of going silver instead but I wanted to try to not wimp out on the gold. Then I remembered I had a knit pig waiting for its wings.
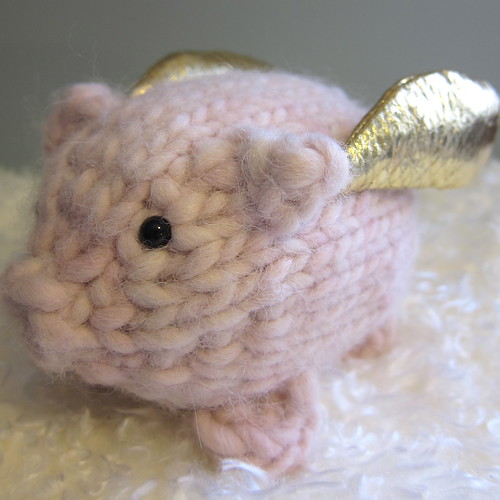
This pattern for a knit pig is one I have been working on for awhile & I’ve done it both in a small & larger size. Size is determined by the weight of the yarn & size of needles used.
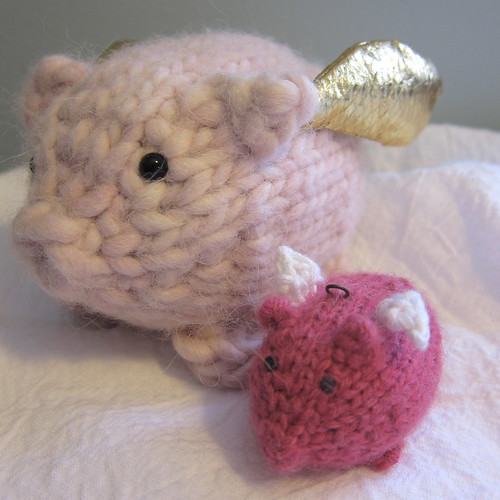
The smaller pig has knit wings but I was afraid knit wings would be too floppy on the larger one though, I haven’t tried it yet. Instead I sewed stuffed golden wings which I then sewed on to the pig.
FLYING PIG PATTERN
(I’ve knit this pattern twice but no one else has test knit is yet. If you find a problem please let me know so I can make corrections.)
The size of your finished pig will depend on what weight yarn you use. My small pig is 2.5 inches long & made with worsted weight while my large pig is 6 inches & made with bulky weight.
Supplies:
Four size 3 double pointed needles for the small
Four size 9 double pointed needles for the large
or size needed to get a nice tight fabric with your yarn
Pink yarn (you won’t even come close to using a ball) – I used a worsed weight for the small & a bulky weight for the large
Scrap white yarn in a similar or thinner weight for wings if knitting them
OR
Gold fabric for wings on large pig. I used a heavy gold fabric that I found in the costume fabric section of the fabric store. It is a gray fabric topped with a crinkly gold. The only issue I had with it is that all the needle & pin holes show so you have to be careful pinning & the gold can crack a little.
Scrap black yarn or embroidery thread for eyes on small pig
OR
Safety eyes for eyes on large pig
Tapestry needle
Gold Thread if doing sewn wings
Scrap yarn or fabric or polyfil for stuffing
Gauge:
7.5 stitches per inch for the small pig
3 stitches per inch for the large pig
Gauge really isn’t super important here you just want to make sure it is tight so the stuffing doesn’t show through.
Body:
Cast on 6 stitches. Place them evenly on 3 double pointed needles & join together without twisting. Put a stitch market between the first & last stitch to mark the row.
Row 1 & 2: knit (for the large pig I skipped row 2)
Row3: Knit into the front & back (kfb) of each stitch (12 stitches)
Row 4: knit
Row 5: *k1, kfb, repeat from * until end of row (18 stitches)
Row 6: knit
Row 7: *k2, kfb, repeat from * until end of row (24 stitches)
Row 8: knit
Row 9: *k3, kfb, repeat from * until end of row (30 stitches)
Row 10-19: knit
At this point embroider your eyes with the back yarn using French knots or attach your safety eyes. This is also a good time to pull your cast on tail inside through the middle of the snout.
Row 20: (k3, ssk)3x, (k3, k2tog)3x (24 stitches)
Row 21: knit
Row 22: (k2, ssk)3x, (k2, k2tog)3x (18 stitches)
Row 23: knit
At this point stuff your pig. Try to get him really full shaping as you go.
Row 24: (k1, ssk)3x, (k1, k2tog)3x (12 stitches)
Row 25: knit
Row 26: (ssk)3x, (k2tog)3x (6 stitches)
Cut off leaving a 6 inch tail. Weave the tail through the remaining stitches and pull tight. Tie a knit close to the body. The tail will be the pig’s tail. I twist it until curly & then cut it to the length I want for the small pig. For the larger pig I knit some corkscrew fringe.
Ears:
Pick up two stitches behind one of the eyes.
Row 1: knit
Row 2: p2tog
Cut yarn leaving a tail. Weave tail through the remaining stitch. Weave the tail through the side of the ear & then pull through the pig cutting off any excess yarn. Do the same with the tail from where you picked up the stitches.
Repeat for the second ear.
Knit Wings:
For the pig’s right wing pick up stitches starting at the back of the pig, for the left wing pick up stitches starting close to the ear. This will help hide the little white line you get from picking up the stitches.
Pick up 3 stitches down the back behind one ear.
Row 1: purl
Row 2: knit
Row 3: purl decreasing one stitch at the back of the pig (2 stitches)
Row 4: knit
Row 5: purl decreasing one stitch at the back of the pig (1 stitch)
Cut 10 inch tail. Weave the tail through the underside of the wing & pull to get the shape you want. Then pull tails through pig & cut off excess.
Repeat for second wing.
Sewn Wings:
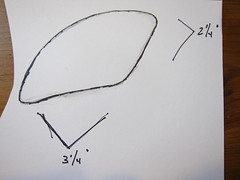
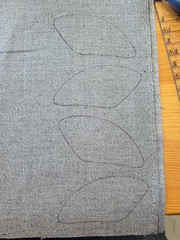
Cut 4 wing shapes out of gold fabric. Sew right sides together with a 1/4 inch seam leaving about a 1 inch opening at the bottom. Clip the seams around the curves.
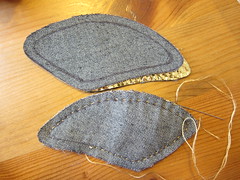

Turn the wings right side out through the hole & fill with a little stuffing. Close the hole with whip stitch. Sew on to pig.
Legs: Make 4
Cast on 3 stitches
Work an icord for 3 rows
Cut a tail & weave it through the stitches & pull tight.
Tie this tail to the cast on tail creating the leg.
Sew on to pig with the tails.
copyright 2011 Kathy Lewinski
www.kat-knits.blogspot.com
Do not sell or duplicate this pattern. Do not sell items made with this pattern. Do not teach this pattern without my permission. Thank you.

LOVE the pig!!!
My favorite color is pink, and my favorite saying is "when pigs have wings!" Also loved the book Perfect the Pig about a flying pig. The book with one of these pigs would make a great child's gift. Thank you so much for sharing! I love your blog. <3
Love it, totally making some this weekend! They'll go perfectly with my knit trilobites! thank you so much for sharing that pattern!
That pig is totally cute. Anyway to crochet him. Thanks. My email is stimm19941999@yahoo.com
Miss Shawn – I don't know how to crochet so am not much help but this site has lots of links to crocheted pig patterns http://www.crochetpatterncentral.com/directory/farm_animals.php
Love the pig – I have some glass ones flying in my studio, now I'll need to do some knit. Wonderin if I could knit them with wire & rose quartz? Hmmm…..
xoxo,
Stephanie
My mom loves pigs and I bet she'd love one of these for her knick knack collection! So cute!
I love this, but i'm an amateur knitter and was wondering if you might make a video tutorial of this because the instructions are a little confusing to me…
Anonymous – I'm sorry I do not have the ability to make a video for you. Perhaps your local knitting store can help you….
I think this is one of the cutest things I have ever seen! I love pigs and am going to have to make a whole family of these to add to my collection. I think I will even make one for my pet mini pig to snuggle with!
I loved this pig so much, and with my sister's birthday coming (who is a PIG fan) I just whipped one up. However, I'm unclear on how to knit a corkscrew tail. Any advice? Thanks so much…LOVE you work! <3
Mike – You could make a braid & just twist it or knit up a short corkscrew fringe & sew it on.
The length of the fringe will depend on the yarn weight and number of stitches you cast on.
Cast on
Row 1: Knit into the front, back & then front of each stitch (you'll triple the number of stitches)
Row 2: Bind off all sts as if to purl.
Twist into a corkscrew.
Do you hgave a secret of a printer friendly version?
Goldwman – I would say your best bet it to you copy & paste the pattern into a word document to make it printer friendly.
Wonderful!
http://pornpig.blogspot.com/